
How to Choose and Use Christmas Light Clips?
Share
If you’re decorating your home with Christmas lights this year, using the right Christmas light clips is essential. The right clips make installation easy, keep lights secure, and prevent damage to your home. This guide will walk you through choosing the best light clips, how to install them, and what mistakes to avoid. By the end, you’ll know exactly which clips are right for your setup and how to use them effectively.
Table of Contents
- What Are Christmas Light Clips and Why Do You Need Them?
- What Are the Different Types of Christmas Light Clips?
- How to Choose the Right Christmas Light Clips for Your Setup?
- Step-by-Step Guide: How to Install Christmas Lights Using Clips
- Common Mistakes to Avoid When Using Christmas Light Clips
- How Many Christmas Light Clips Do You Need? A Quick Calculation Guide
- Best Practices for Storing and Reusing Christmas Light Clips
- Conclusion: Making Your Christmas Light Installation Easy and Stress-Free
What Are Christmas Light Clips and Why Do You Need Them?
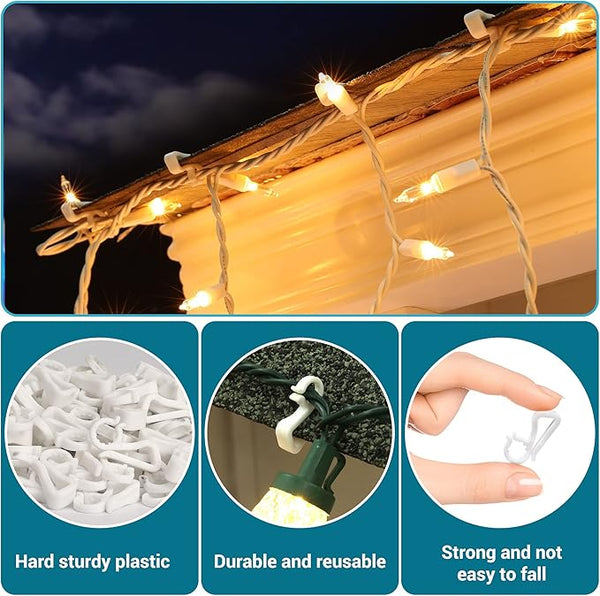
Christmas light clips are small, versatile holders that attach lights securely to different surfaces, such as gutters, shingles, or windows. They’re specially designed to make installing lights easy and hassle-free. Unlike nails or staples, which can damage your home, clips provide a safe, non-destructive way to mount holiday lights.
Why Should You Use Light Clips?
- Damage-Free Installation: Clips prevent the need for nails or adhesives that can leave permanent marks.
- Secure Hold: They keep lights firmly in place, even in windy or snowy conditions.
- Professional Look: Clips allow for precise spacing and alignment, giving your display a neat, professional appearance.
Using the right clip for each surface type and bulb size is critical. Choosing the wrong clip can lead to uneven lines, lights falling off, or even damage to your home’s exterior.
What Are the Different Types of Christmas Light Clips?
Choosing the right type of Christmas light clip depends on the location, surface, and type of lights you’re using. There are specialized clips for different areas of your home and each has unique features that make them best suited for specific purposes. Let’s break down the most common types:
Gutter Clips
Gutter clips are designed to securely attach Christmas lights along your gutter. They’re the best option for outlining your roofline without causing any damage to the surface. Most gutter clips are compatible with C7 and C9 bulbs, as well as smaller string lights.
- Best for: Outlining rooflines.
- Installation Tip: Slide the clip under the front lip of the gutter and snap the light bulb into place.
| Clip Type | Compatible Light Type | Recommended Use | Price Range |
|---|---|---|---|
| Gutter Clips | C7, C9, Mini LED | Rooflines, Gutters | $10-$15 (pack of 50) |
Shingle Clips
Shingle clips are designed to fit snugly under roof shingles. They are ideal for homeowners who want to outline the roof edges without affecting the gutter system. Shingle clips usually hold mini lights or LED string lights, making them perfect for creating a clean line along the roofline.
- Best for: Roof edges.
- Installation Tip: Slide the shingle clip under a loose shingle and attach the light strand to the front hook.
| Clip Type | Compatible Light Type | Recommended Use | Price Range |
|---|---|---|---|
| Shingle Clips | Mini, LED String Lights | Roof edges, Eaves | $8-$12 (pack of 50) |
All-Purpose Light Clips
All-purpose clips, as the name suggests, are highly versatile. They can attach to both gutters and shingles, making them a great choice for those who want flexibility. These clips are compatible with C7, C9, and mini lights, allowing for various bulb types in one setup.
- Best for: Mixed-use installations.
- Installation Tip: Use them wherever you need quick adjustments between shingles and gutters.
| Clip Type | Compatible Light Type | Recommended Use | Price Range |
|---|---|---|---|
| All-Purpose Clips | C7, C9, Mini | Rooflines, Shingles, Gutters | $15-$20 (pack of 100) |
Adhesive Clips for Windows and Smooth Surfaces
For smooth surfaces like windows, doors, or garages, adhesive clips are the best option. These clips have a sticky backing that allows them to attach to smooth, flat surfaces. They’re best for temporary installations and work well with mini LED string lights.
- Best for: Indoor and outdoor smooth surfaces.
- Installation Tip: Clean the surface before applying the clip to ensure a strong hold.
| Clip Type | Compatible Light Type | Recommended Use | Price Range |
|---|---|---|---|
| Adhesive Clips | Mini LED, Fairy Lights | Windows, Walls, Garages | $8-$12 (pack of 30) |
How to Choose the Right Christmas Light Clips for Your Setup?
Choosing the right Christmas light clips depends on three main factors: the type of lights, the surface you’re attaching to, and the weather conditions. Here’s a quick guide to help you select the perfect clip:
1. How to Match Clip Type with Bulb Size
Different clips are designed for different bulb sizes, such as C7, C9, or mini LED lights. Using the wrong clip can cause bulbs to slip or not fit at all.
| Bulb Type | Recommended Clip Type | Use Case |
|---|---|---|
| C7, C9 Bulbs | Gutter Clips, All-Purpose Clips | Rooflines, Gutters |
| Mini Lights | Shingle Clips, Adhesive Clips | Roof edges, Windows |
2. Are There Clips for Icicle and Net Lights?
Yes, icicle light clips are specially designed to hang vertically, creating the dripping effect that icicle lights are known for. For net lights, you can use hook-style clips that attach to bushes or walls, ensuring the lights stay flat and evenly spaced.
- Pro Tip: Choose clips that allow for both horizontal and vertical hanging if you plan to use a mix of light types.
3. Consider Weather Conditions
If you live in an area prone to heavy rain, snow, or high winds, choose clips that are made from UV-resistant plastic or stainless steel. These materials are more durable and less likely to crack or degrade over time.
Step-by-Step Guide: How to Install Christmas Lights Using Clips
Installing Christmas lights can be a daunting task, but with the right clips, it’s much easier. Follow this step-by-step guide to get professional-looking results:
Step 1: Planning and Measuring
Measure the length of the area you’re decorating. This will determine the number of lights and clips you need. As a general rule, use one clip every 12 inches for mini lights and one clip every 8 inches for larger bulbs like C7 or C9.
Step 2: Installing Gutter or Shingle Clips
- For Gutter Clips: Hook the clip onto the front edge of the gutter and insert the light bulb into the holder.
- For Shingle Clips: Slide the clip under the edge of the shingle, making sure it’s secure.
Step 3: Adding Lights to the Clips
Snap each bulb or light section into the clips. Be gentle to avoid damaging the wires or bulbs.
Step 4: Securing Loose Ends
Use zip ties or extra clips to secure any loose ends. This is especially important in windy areas to prevent lights from detaching.
Common Mistakes to Avoid When Using Christmas Light Clips
Even with the right clips, mistakes can happen. Here’s how to avoid the most common errors:
Mistake #1: Using Indoor Clips Outdoors
Indoor clips are not made to withstand rain, snow, or extreme cold. Always use outdoor-rated clips for exterior installations.
Mistake #2: Overloading Clips
Trying to hang too many lights on a single clip can cause sagging and may lead to clips snapping under pressure.
- Solution: Use additional clips for heavy strands or double up on clips in high-stress areas.
Mistake #3: Not Matching Clip Size to Bulb Type
If the clip is too big for the bulb, it won’t hold securely. Always check compatibility before purchasing.
How Many Christmas Light Clips Do You Need? A Quick Calculation Guide
To determine how many clips you need, measure the total length of the area and use the following formula:
Calculation Table:
| Light Type | Spacing | Clips Needed Per 10 Feet |
|---|---|---|
| Mini LED String Lights | 1 clip every 12 inches | 10 clips |
| C7/C9 Bulbs | 1 clip every 8 inches | 15 clips |
| Icicle Lights | 1 clip every 6-8 inches | 15-20 clips |
Best Practices for Storing and Reusing Christmas Light Clips
Proper storage can save you time and money next season. Follow these best practices to keep your clips in good shape:
- Label and Sort by Type: Keep gutter clips, shingle clips, and adhesive clips in separate, labeled containers.
- Avoid Tangling: Wrap light strands and clips separately to prevent tangling.
- Use Clear Storage Boxes: Transparent boxes make it easy to see what you have, reducing the chance of misplacing items.
Conclusion: Making Your Christmas Light Installation Easy and Stress-Free
Using the right Christmas light clips can turn a stressful setup into a quick and easy project. By choosing clips that match your lights, surface, and weather conditions, you’ll achieve a neat and secure display that lasts all season long. Follow the tips and guides in this article to make your holiday decorating a breeze!
Further Reading:













 />
/>
 />
/>
 />
/>
 />
/>
 />
/>