

The Ultimate Guide to Under Cabinet Outlets: Shopping and Installation Tips
Are Under-Cabinet Outlets Worth It?
Under-cabinet outlets are worth considering when you want usable kitchen power without a row of outlet covers interrupting the backsplash. The best version is not simply the most hidden one. It is the outlet you can reach comfortably, that fits the plugs you use, and that can still be inspected or serviced after the cabinets are finished.
For most kitchens, the practical shortlist is a permanent outlet strip mounted beneath the upper cabinets or a recessed outlet placed where a flatter plug profile helps. Pop-up outlets are mainly an island or countertop solution. A portable power strip may be useful as a temporary accessory, but it is not the same as a permanently installed outlet system.
If you are remodeling, choose outlet locations while the cabinet, backsplash, appliance, and lighting plans can still be coordinated. If the kitchen is already finished, first decide whether moving electrical outlets is worth the disruption; sometimes a well-placed existing outlet and a plug-in or rechargeable light are the simpler answer.
Why Install Under-Cabinet Outlets? Pros and Cons
What homeowners usually like
- A cleaner backsplash: fewer visible wall plates can keep tile, stone, or patterned surfaces looking continuous.
- Power close to the work area: coffee makers, mixers, and chargers can plug in near where they are used.
- Flexible outlet coverage: a permanent strip can provide several connection points along a counter.
- Better coordination: outlet, lighting, and appliance power can be planned together during a remodel.
What to consider first
- Installation cost: a permanent hidden system normally needs more planning and professional electrical work.
- Plug visibility: a large adapter or downward-hanging cord can still be noticeable beneath a shallow cabinet lip.
- Reach: an outlet positioned too far back may be awkward for some users.
- Future access: an outlet, driver, or adapter should not be trapped behind fixed cabinetry.
Types of Under Cabinet Outlets
The term under-cabinet outlet is used for products that look similar online but are installed and used differently. Compare the mounting location, visibility, plug clearance, and installation method—not just the number of sockets.
1. Recessed Outlets
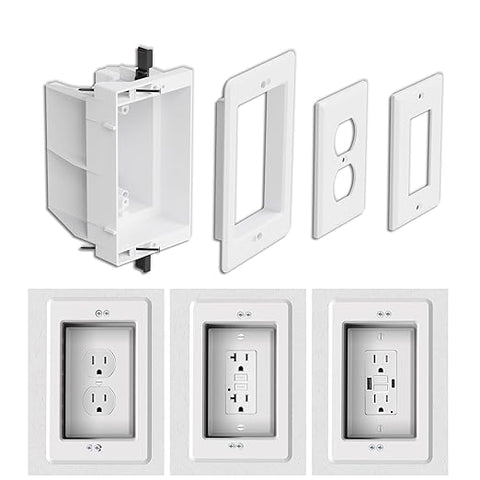
A recessed outlet sits back from the surrounding surface. It can help a plug or adapter project less into the room, which may be useful beneath a cabinet, beside an appliance garage, or in another tight location.
- Good choice when: a flatter finished profile matters and the mounting area has enough depth.
- Shopping check: compare the recess depth with the actual plug, including right-angle and bulky transformer plugs.
- Installation check: confirm the mounting location and clearances with the electrician and cabinetmaker.
2. Permanent Under-Cabinet Outlet Strips
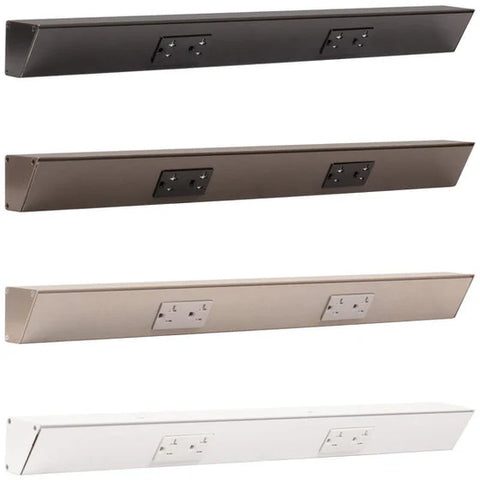
A permanent outlet strip places several fixed receptacles in one slim row. Mounted beneath an upper cabinet, it can keep the backsplash clear while giving small appliances several places to connect.
- Good choice when: you are remodeling and want multiple fixed outlets along a worktop.
- Shopping check: look at the strip length, spacing between outlets, plug direction, finish, controls, and whether the system is intended for permanent installation.
- Installation check: ask the electrician how the strip will be supplied, protected, mounted, and serviced in your location.
Do not confuse this with a portable power strip. A normal plug-in strip remains portable equipment; it should not be routed through a wall or cabinet or treated as built-in wiring.
3. Pop-Up or Pop-Down Outlets
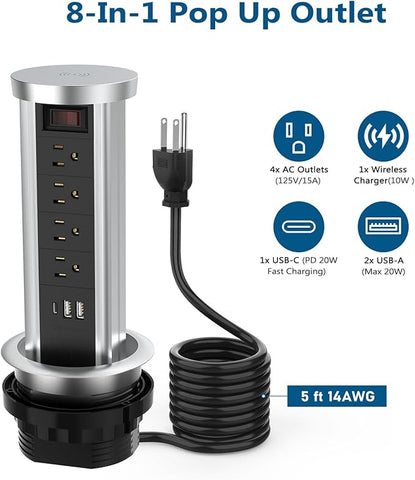
A pop-up or pop-down outlet stays concealed until needed. This is usually an island or countertop choice rather than a simple cabinet-underside outlet. It can look clean when closed, but the mechanism takes up space below and must suit the exact mounting location.
- Good choice when: an island needs occasional power and a visible side outlet does not suit the design.
- Shopping check: confirm the product's intended mounting surface, closed dimensions, open height, spill-related instructions, and room for plugs.
- Installation check: make sure the body will not conflict with drawers, shelves, plumbing, or storage below.
4. Standard Outlets in Concealed Locations
A standard receptacle can sometimes be placed beneath a cabinet, on an island end panel, or inside a purpose-designed appliance garage. It may cost less than a specialty system, but the faceplate, plugs, and cords are often more visible. The location still has to be suitable, reachable, and approved for the intended use.
How to Choose the Right Under-Cabinet Outlet
Begin with what will be plugged in, not with the outlet's appearance. A phone charger, a coffee maker that stays on the counter, and an under-cabinet lighting adapter create different space and access needs.
| Your priority | Start by comparing | Watch for |
|---|---|---|
| Keep the backsplash uninterrupted | Permanent under-cabinet outlet strip | Visible hanging plugs, cabinet lip depth, and comfortable reach |
| Reduce how far a plug sticks out | Recessed outlet | Recess depth, plug shape, cord direction, and wall or cabinet depth |
| Add occasional island power | Pop-up outlet or approved island location | Space below, drawer conflicts, spills, and access when open |
| Power several countertop appliances | Multiple permanent receptacles or a permanent outlet strip | Outlet spacing, appliance plug size, circuit planning, and local requirements |
| Power under-cabinet lights | Accessible plug-in point sized for the selected light kit | Adapter size, cable reach, cabinet gaps, controls, and future replacement |
Six questions to ask before buying
- What will stay plugged in? List the actual appliances, chargers, and lighting adapters.
- How large are the plugs? Measure bulky adapters and right-angle plugs, not only the cord.
- Will the outlet be comfortable to reach? Test the position with every household member who will use it.
- How much of the outlet and cord will be visible? View the proposed position while standing and sitting nearby.
- Can it be serviced later? Avoid a location that becomes inaccessible after tile, trim, shelving, or appliances are installed.
- Is it the correct product for the job? Confirm whether it is a permanent outlet system, a portable accessory, or a specialty countertop product.
10 Under-Cabinet Outlet Placement and Design Ideas
The best idea depends on whether you are hiding the outlet face, shortening visible cords, or bringing power to a specific task. Use these as design starting points, then have the final location reviewed for your kitchen.
1. Run a permanent outlet strip beneath the cabinet lip
This keeps wall plates off the backsplash and spreads connection points along the counter. Check the view from normal eye level: a deep strip or large plugs may still be visible if the cabinet has little front trim.
2. Recess an outlet where a plug would otherwise project
A recessed box can help near a compact appliance or lighting adapter. Bring the actual plug to the planning meeting so the recess is deep and wide enough to make a useful difference.
3. Place outlets horizontally along the backsplash
If under-cabinet mounting feels hard to reach, horizontal wall outlets can look quieter than vertically oriented plates. Aligning them with tile joints or another strong line can help them blend in without sacrificing normal access.
4. Coordinate the faceplate with the backsplash
A matching or low-contrast plate can make a conventional outlet less noticeable. This is often simpler than moving every outlet beneath the cabinets, especially in a finished kitchen.
5. Use a pop-up outlet on an island
A retractable outlet can supply occasional island tasks while staying hidden when closed. Before choosing one, confirm the mechanism will not consume needed drawer or storage space below.
6. Use an approved island end or overhang location
An accessible side location may be easier to use and maintain than a countertop mechanism. Check whether cords would cross a walkway, interfere with seating, or hang where children can pull them.
7. Plan power inside an appliance garage
This can keep a frequently used appliance and its cord out of sight. The cabinet design, ventilation, door behavior, appliance instructions, and electrical requirements all need to work together; do not assume any ordinary cabinet is suitable.
8. Use a purpose-designed charging drawer system
A charging drawer can clear phones and cables from the counter. Choose a listed system intended for a moving drawer and have it installed as directed—do not run an ordinary extension cord into a drawer.
9. Hide a service outlet behind a removable panel
A removable panel can conceal a lighting plug or adapter while keeping it reachable. Label the panel and make sure removal does not require dismantling fixed cabinetry.
10. Coordinate outlets around windows and breakfast nooks
Windows, open shelves, and small seating areas can interrupt a normal outlet layout. Mark where appliances and chargers will actually be used, then place power where cords do not stretch across a sink, cooktop, seat, or walkway.
Plan Appliance and Lighting Power Before Installation
This part can stay simple. Take a photo or draw a front view of each cabinet wall, then mark appliances and under-cabinet lights separately. The sketch helps the electrician and cabinetmaker understand what you want without turning you into the electrical designer.
- Circle appliance zones: mark the coffee maker, toaster, mixer, and other items likely to stay on the counter.
- Draw the desired lighted areas: stop each line at a hood, window, tall cabinet, or open gap.
- Group connected cabinets: a straight cabinet run may use one compatible plug-in light kit; sections divided by a hood or window may need separate groups.
- Mark each plug and adapter: choose a dry, protected place that is hidden from normal view but reachable without removing fixed cabinetry.
- Show the likely cable path: let the electrician and cabinetmaker agree on the final route and holes before drilling.
One connected cabinet run
One accessible lighting plug may be enough
This works when the chosen light kit is designed to connect all required strips or bars. Confirm the supported quantity and keep its adapter reachable.
Runs divided by a hood or window
Plan separate lighting groups
Do not assume a cable can cross every gap neatly. Separate groups may need separate plugs, adapters, or controls.
One isolated dark cabinet
Consider a rechargeable light
If adding power would be disruptive, a removable rechargeable light may be easier—provided regular charging fits your routine.
For an existing kitchen where new wiring is not desirable, compare the practical trade-offs in the No-Wiring Under-Cabinet Lighting guide. If you have not selected the lights yet, measure every cabinet run and decide whether you prefer plug-in or rechargeable power before finalizing outlet locations.
Shopping and Installation Checklist
Before you buy
- Photograph and measure the proposed location, including cabinet depth and front-lip height.
- List the appliances and lighting products that will connect there.
- Measure their plug bodies and note which direction each cord exits.
- Check whether the product is intended for permanent installation or portable use.
- Read the manufacturer's mounting, clearance, location, and use instructions.
- Confirm the finish and visible dimensions using a sample or full-size paper template when possible.
Before anyone drills or cuts
- Temporarily mark the outlet outline with painter's tape and test the reach from normal working positions.
- Open every nearby door and drawer and check for hinges, slides, shelves, plumbing, appliances, and trim.
- Show the actual outlet system and light kit—not only a screenshot—to the relevant installers.
- Ask the electrician to choose the final electrical location, protection, and installation method.
- Ask the cabinetmaker to approve visible mounting, access panels, trim, and cable openings.
- Photograph the approved locations and hidden routes before the cabinets and backsplash close them in.
Before the job is finished
- Plug in the actual appliances and check that adjacent sockets remain usable.
- Confirm cords do not cross hot, wet, sharp, or moving areas.
- Make sure lighting adapters, controls, and connections can still be reached.
- Keep the product instructions and label any concealed service panel for the next homeowner or installer.
Use the Design Idea—Then Confirm the Local Requirements
Kitchen outlet requirements depend on location, purpose, installation method, and the rules adopted where you live. Avoid relying on a universal outlet height, spacing number, or protection rule from a general shopping article.
ESFI identifies kitchens as an important area for GFCI protection and explains how GFCIs reduce shock risk in its consumer GFCI guidance. A qualified local electrician should decide what protection and placement your project requires.
UL Solutions also distinguishes permanently installed outlet assemblies from portable power strips in its power-strip safety overview. Never run a portable strip's cord through a wall or cabinet, connect strips together, or use one as a substitute for permanent wiring.
Under-Cabinet Outlet FAQs
Can outlets be installed under kitchen cabinets?
Yes. Permanent outlet strips, recessed outlets, and standard receptacles can all be considered, depending on the cabinet, intended use, and local requirements. Have the final product and location approved by the electrician responsible for the work.
What is the difference between an outlet strip and a power strip?
A permanent outlet strip is a fixed electrical system intended for installation as part of the building. A portable power strip plugs into an existing outlet and remains portable equipment. Similar appearance does not make them interchangeable.
Do under-cabinet kitchen outlets need GFCI protection?
GFCI protection is common and important in kitchens, but the specific answer depends on the outlet's location, purpose, and local rules. Ask a qualified local electrician to apply the requirements for your project.
How can I hide kitchen outlets without putting them under the cabinets?
Consider horizontal placement, low-contrast faceplates, alignment with backsplash joints, an island side location, or a properly designed appliance garage. The best choice keeps the outlet easy to use and service rather than merely making it invisible.
Can an outlet go inside a cabinet or drawer?
It may be possible with a purpose-designed system and suitable cabinet planning. Moving drawers, door behavior, ventilation, appliance instructions, cord protection, access, and local requirements all matter. Do not improvise with an extension cord.
What height should under-cabinet outlets be?
There is no single height that suits every cabinet, user, plug, and jurisdiction. Use the actual cabinet and appliances to test reach and visibility, then have the electrician set the final compliant location.
Can one outlet power several under-cabinet lights?
Yes, when the selected light kit is designed for the number and type of strips or bars you plan to connect. Follow the kit instructions and do not add unsupported lights, splitters, or adapters.
What is the difference between GFI and GFCI?
The terms are commonly used for the same ground-fault protection concept; GFCI is the standard name you will usually see on devices and in safety guidance.
The Best Outlet Plan Is Easy to Use After the Remodel Is Over
Choose the outlet type only after you know what will plug in, how the plug will look, and how easily it can be reached. Test the position with real appliances, keep permanent and portable products clearly separated, and preserve access to every lighting adapter or connection.
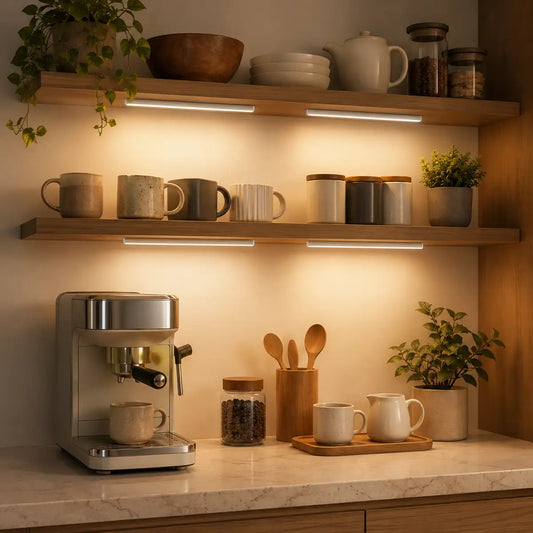
If outlets are only one part of your project, compare current Lumaz under-cabinet lighting options after you have measured each cabinet run and decided whether plug-in or rechargeable power fits the space.

















 />
/>
 />
/>
 />
/>
 />
/>
 />
/>