Best Hardwired Under Cabinet Lighting: Fixtures, Controls and Remodel Fit
The Best Hardwired Setup Depends on Where Power Enters the Cabinets
For a permanent kitchen with a switched household feed already arriving beneath each cabinet run, start with a purpose-built direct-wire LED bar. It keeps the fixture and electrical connection together and is usually the simplest fixture to specify for a straightforward remodel. For a long, custom-looking line of light or several separated runs, choose low-voltage LED tape in a channel, fed by an accessible, correctly matched hardwired driver. Surface-mounted low-voltage pucks fit small display or accent bays, but are rarely the first choice for even light across a long food-prep counter.
The best choice here means the system that fits your kitchen, not one universal brand winner. Before choosing a light, decide whether your wall control is a simple switch or a dimmer, where each cabinet run starts and stops, and where a future electrician can reach the driver or connection. Those choices determine whether the finished installation feels built in or becomes difficult to use and service.
Three Hardwired Lighting Routes Worth Comparing
“Hardwired” describes the permanent power connection, not one fixture shape. A direct-wire fixture accepts household power through an approved connection. A low-voltage system connects household power to a driver, which then supplies the strip or puck lights at their specified 12V or 24V. A plug-in bar with its cord merely hidden behind a cabinet is still a plug-in system.
| Best fit | What you get | What to verify before buying | Main trade-off |
|---|---|---|---|
|
Direct-wire LED bar Existing switched feed; simple cabinet runs |
A rigid, usually diffused fixture with a purpose-made electrical entry and a clean, continuous task-light shape. | Approved direct-wire installation, feed-entry position, fixture lengths, linking method, light output, and the exact wall-dimmer compatibility if dimming matters. | Fixed lengths may leave gaps or demand multiple fixtures; an integrated driver may mean replacing the whole bar when it fails. |
|
Driver-fed LED tape in a channel Custom lengths; uninterrupted visual line |
A flexible low-voltage strip behind a diffuser, with a separate driver that can serve one or more planned runs. | Strip voltage, total load, driver capacity and control type, channel depth, feed location, and a reachable driver location. | More parts must be specified together; a bare strip is not a complete hardwired kit. |
|
Driver-fed surface pucks Short or isolated display bays |
Individual pools of light where a continuous line is not the desired look. | Puck voltage, compatible driver and control, number of fixtures, cable path, and whether the resulting light pools suit the counter. | Distinct bright spots and darker gaps can be distracting across a long prep surface. |
For a concrete direct-wire example, Jasco's UltraPro 12-inch fixture is specified by its manufacturer for direct-wire installation, selectable white light, 90 CRI, and in-wall dimming. That shows the kind of product information to look for; it does not establish compatibility with your particular dimmer or prove that 12 inches is the right length for your cabinets.
Choose by the Kitchen You Are Actually Remodeling
Existing feed under each cabinet: favor a direct-wire bar
If the previous lights were hardwired and the new fixtures can use appropriate approved connection points, a direct-wire bar can preserve the wall-switch routine without adding a separate low-voltage distribution system. Match each bar to the cabinet span and check where its wiring entry sits before ordering. The location of an old cable does not make every new fixture an easy swap.
Open-wall remodel or custom cabinetry: favor a driver-fed linear system
When the electrician and cabinet installer can plan power and low-voltage paths together, a driver-fed strip in a shallow channel gives more freedom over long or uneven runs. Put the driver somewhere reachable, not sealed behind new tile or cabinetry. Agree on how separated cabinet sections will connect before the walls close.
One small accent bay: consider pucks
A display shelf or short cabinet may benefit from separate points of light. For the main prep counter, first check whether a linear bar or diffused tape would provide more consistent coverage. A puck layout is a visual choice, not a shortcut around specifying a compatible driver.
If you are still deciding whether permanent wiring is worth the project at all, compare the ownership and installation trade-offs in Hardwired vs. Plug-In vs. Rechargeable Under Cabinet Lighting. This page assumes you have already chosen a permanent kitchen installation and need to select its fixtures and controls.
A Wall Switch Is Easy to Ask For; Dimming Needs a Matched System
Decide how the light should behave at the wall before buying a fixture. A simple switched direct-wire bar and a dimmable direct-wire bar are not necessarily the same product. In a low-voltage setup, the wall dimmer must work with the driver's input and control method; the strip's “dimmable” label alone does not make any wall dimmer suitable. Lutron's under-cabinet guidance describes both external 12V or 24V drivers and the need to pair them with compatible controls.
- Existing wall switch: confirm whether it cuts power to the intended cabinet feed and whether multiple runs should turn on together.
- Existing wall dimmer: record its model number and ask the seller or installer to confirm the exact fixture or driver combination, supported load, and low-brightness behavior.
- Future smart control: decide whether the wall device, driver, and light should remain usable after a power interruption; do not assume every electronic control returns to its previous state.
A separate article can walk through when an LED strip needs a driver. Here, the buying decision is simple: purchase the light, driver, and wall control as one compatible system, with enough access to replace a failed part later.
Where a Lumaz Strip Fits a Permanent Installation
For a custom linear route, the Lumaz 24V COB strip below is a low-voltage light component, not a complete direct-wire fixture. Its 2-pin wire option, cut-to-fit lengths, slim 8mm width, and Ra>90 color rendering make it worth considering for a channel beneath cabinets. The product listing says a 24V power supply is not included. A compatible driver, suitable housing or channel, approved connections, and any wall-dimming parts need to be specified separately.
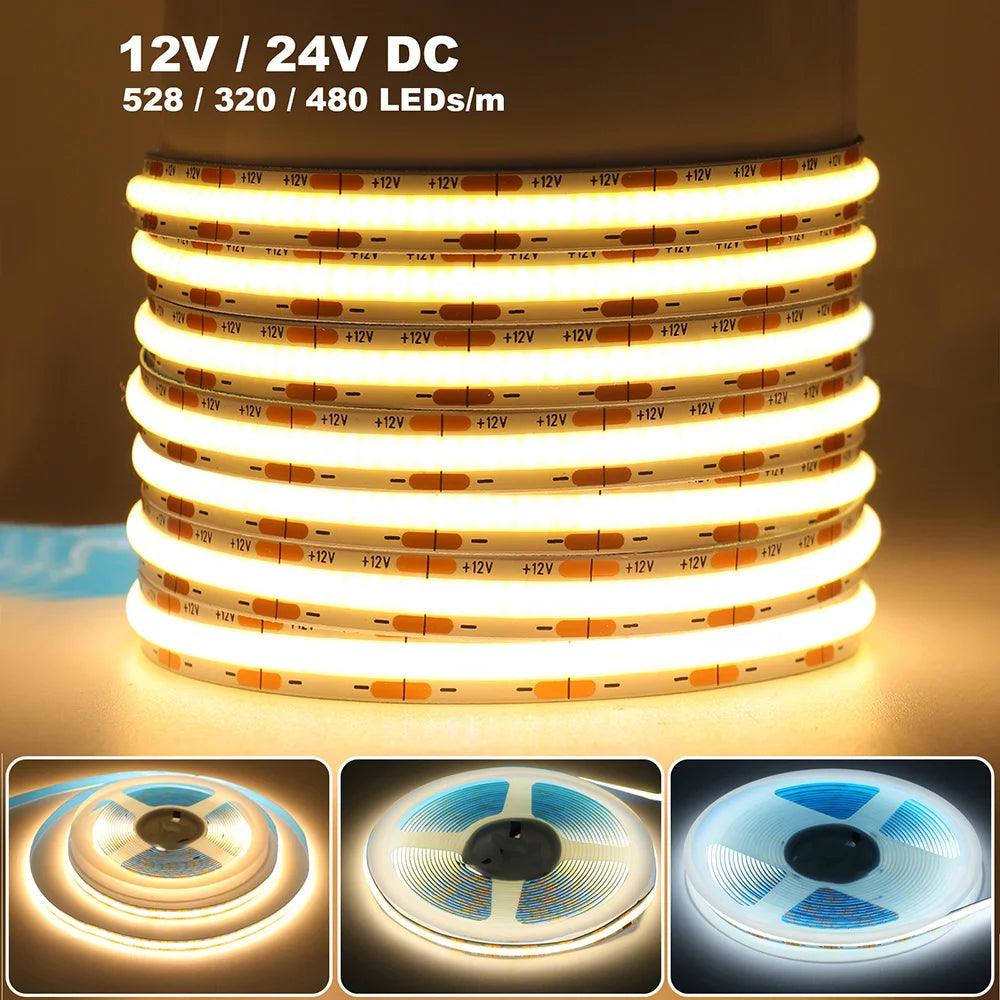
- Choose the 2-pin wire style when your installer specifies a wired 24V strip route; confirm the exact color and length variant.
- COB output and an 8mm strip width suit a slim channel where you want a smoother visual line across the counter.
- A 24V driver or power supply, channel, and wall-dimming components are separate purchases; never connect the strip directly to household voltage.
If your project calls for a ready-to-mount direct-wire bar with its own line-voltage connection, choose a fixture explicitly listed for that installation. Lumaz's plug-in bars and bare low-voltage strips should not be relabeled as direct-wire bars to make them fit this project.
The Short Buying Brief to Take to a Seller or Electrician
Photograph the old fixture labels and sketch each cabinet span. Then bring these five decisions to the person specifying or installing the system:
- Power entry: where does the permanent feed reach the cabinets, and is it suitable for the selected fixture or an accessible driver?
- Fixture and light: do the chosen bar lengths or strip-channel layout cover the actual chopping, sink, and appliance zones without awkward dark gaps?
- Control: is the wall device a switch or dimmer, and which exact fixture-driver-control combination is approved to work together?
- Connections across gaps: are separated cabinet runs linked with approved parts, supplied from planned drivers, or intentionally controlled as separate zones?
- Future service: can a failed bar, driver, connector, or strip section be reached and replaced without damaging finished cabinetry or backsplash?
Ask the installer to confirm local electrical rules, suitable listed equipment, accessible connections, and who will make the household-wiring changes. For the step-by-step project sequence, use the separate hardwired installation guide; this buying guide stops at choosing the system.
Hardwired Under-Cabinet Buying Questions
Are direct-wire bars better than LED strip lights?
Neither is universally better. A direct-wire bar is usually easier to specify when an appropriate switched feed already reaches a straightforward cabinet run. A 12V or 24V strip with an accessible driver is more flexible for custom lengths and a continuous line. Compare the complete system, including control and future service, rather than the light source alone.
Can I hardwire a plug-in under-cabinet light?
Only when that exact fixture is approved for conversion and the manufacturer specifies the compatible converter and installation method. Hiding or cutting off a plug does not make an ordinary plug-in bar a listed direct-wire fixture. Ask the manufacturer and electrician before buying for that purpose.
Will my existing wall dimmer work with a new hardwired LED light?
Not automatically. The fixture or driver must support the dimmer's control method and installed load. Check the exact model combination before buying, then confirm that the light behaves acceptably at its lowest useful setting.
What if I want one switch for several cabinet sections?
Plan the separate runs, their drivers or approved linking parts, and the total load as one system. The desired control can be simple, but its cable paths and service access need agreement before the remodel is finished.
Continue With the Right Next Step
Broader hub
Explore Under Cabinet Lighting
See fixture forms and finishes after you have chosen the permanent power route.
Practical next step
Plan the Hardwired Installation
Turn the chosen fixture and control system into an installation plan with clear electrical boundaries.
Related alternative
Reconsider the Power Route
Compare hardwired, plug-in, and rechargeable ownership if a permanent installation no longer fits the kitchen.