
How to Set an Outdoor Lighting Timer: A Step-by-Step Guide
Setting an outdoor lighting timer is a simple but effective way to automate your outdoor lighting system. Whether you're looking to save energy, enhance security, or simply enjoy the convenience of scheduled lighting, using a timer can make a big difference. This guide will take you through the essential steps, helping you set up and troubleshoot outdoor lighting timers like a pro.
Table of Contents
- Why Use an Outdoor Lighting Timer?
- Types of Outdoor Lighting Timers
- How to Choose the Right Outdoor Lighting Timer
- Step-by-Step Guide to Setting an Outdoor Lighting Timer
- Common Issues with Outdoor Lighting Timers and Solutions
1. Why Use an Outdoor Lighting Timer?
Using an outdoor lighting timer offers several practical benefits, making it a smart addition to your home’s lighting setup. Here are a few reasons why you should consider using one:
- Energy Savings: With a timer, your outdoor lights won’t stay on all night, saving you money on your energy bill. You can set them to turn off when you don't need them.
- Convenience: Timers eliminate the need to manually turn lights on and off. They ensure your outdoor lights are operating on a schedule, offering convenience whether you're home or away.
- Enhanced Security: Timers can make your home appear occupied even when you’re not around. By setting the lights to turn on at specific times, you add an extra layer of security by deterring potential intruders.
- Environmentally Friendly: By reducing the time your outdoor lights are on, you reduce overall energy consumption, making a positive environmental impact.
In short, outdoor lighting timers help you balance convenience, security, and energy savings, making them a must-have for many homeowners.
2. Types of Outdoor Lighting Timers
When selecting a timer for your outdoor lights, it's important to understand the different types available. Each has its own features, benefits, and limitations. Let’s break them down:
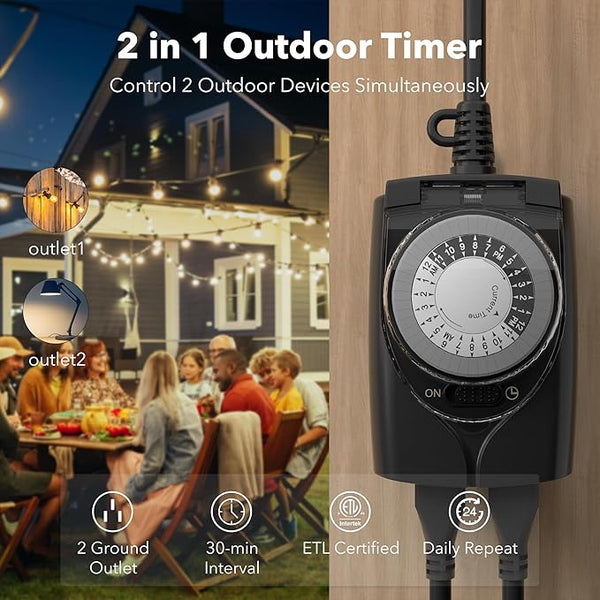
1. Mechanical Timers
- How They Work: Mechanical timers use a dial with notches to set specific times for the lights to turn on and off. They’re simple and reliable, requiring no programming.
- Best For: Basic setups with a fixed schedule. They are ideal for homeowners who prefer simplicity.
- Limitations: Less precise than digital timers, and they can wear out over time.
2. Digital Timers
- How They Work: Digital timers use an LCD display and buttons to set precise on/off times. These timers are more flexible, allowing for multiple on/off cycles.
- Best For: Homeowners who want more control over their lighting schedule and need multiple daily cycles.
- Limitations: Requires batteries or constant power and may have a steeper learning curve for programming.
3. Smart Timers
- How They Work: Smart timers connect to your smartphone or home automation system, allowing you to control your lights remotely or via voice command. These timers often integrate with platforms like Google Home, Amazon Alexa, or Apple HomeKit.
- Best For: Tech-savvy users who want the flexibility to control their outdoor lights from anywhere, even when they’re not home.
- Limitations: Typically more expensive and require a stable Wi-Fi connection.
Here’s a quick comparison:
| Timer Type | Key Features | Best For | Drawbacks |
|---|---|---|---|
| Mechanical | Simple dial for time setting | Basic setups with a fixed schedule | Limited to one cycle per day |
| Digital | Precise time settings, multiple cycles | More flexibility and control | May require learning curve |
| Smart | Remote control via smartphone or voice | Full integration with smart home systems | Higher cost, depends on Wi-Fi |
Each timer type serves different needs, so choose one based on your preferences and the complexity of your lighting setup.
3. How to Choose the Right Outdoor Lighting Timer
Choosing the right outdoor lighting timer depends on your specific needs. Here’s what to consider when making your decision:
- Number of Cycles: If you need lights to turn on and off multiple times a day, a digital or smart timer would be the best choice. Mechanical timers are more limited and only allow for a single on/off cycle.
- Outdoor Durability: Since the timer will be exposed to outdoor elements, make sure to pick one that’s designed to handle weather conditions. Look for timers with an IP rating (Ingress Protection) of IP44 or higher to ensure water resistance.
- Ease of Use: If you’re looking for simplicity, a mechanical timer is the easiest to use, but if you want more control and scheduling flexibility, a digital timer or smart timer would be a better fit.
- Power Source: Mechanical and digital timers typically plug directly into an electrical outlet, while smart timers may rely on Wi-Fi. Ensure that your home has the necessary infrastructure for the timer type you choose.
- Budget: Mechanical timers are the most budget-friendly, with prices starting at $10–$20, while smart timers can range from $30 to $100 or more. Choose a timer that fits your budget while meeting your needs.
4. Step-by-Step Guide to Setting an Outdoor Lighting Timer
Setting up an outdoor lighting timer is easier than you might think. Follow these simple steps to get your outdoor lights running on a schedule:
Step 1: Connect the Timer to the Power Source
Plug your timer into an outdoor-rated outlet. Make sure the timer is rated for outdoor use and has weather-resistant features like a covered socket.
Step 2: Set the On and Off Times
- For mechanical timers, rotate the dial to set the on/off times. The notches on the dial correspond to hours of the day. Push the prongs inward for the time you want the light to turn on, and pull them out for the off times.
- For digital timers, follow the user manual to program the on/off times using the buttons. Most timers allow you to set multiple cycles for a day.
- For smart timers, use the companion app or smart home platform to program the timer. You can set the on/off schedule and even adjust it remotely.
Step 3: Test the Timer
Once you’ve programmed the timer, test it by switching on your outdoor lights. If they don’t turn on/off at the correct times, double-check the settings or power source.
Step 4: Adjust for Daylight Saving Time (if applicable)
If your timer doesn't automatically adjust for daylight saving time, make sure to update the settings manually when the time changes.
Step 5: Monitor and Adjust Settings
Over time, you may want to tweak the timer settings, especially if the season changes or your outdoor lighting needs shift. Many timers allow you to easily change the on/off times as needed.
5. Common Issues with Outdoor Lighting Timers and Solutions
Even with a high-quality timer, you may run into a few common problems. Here are solutions to some frequent issues:
- Lights Won’t Turn On/Off: This may be due to improper programming. Double-check your settings, especially if you’re using a digital or smart timer.
- Timer Stops Working After a Storm: If the timer is exposed to rain, it may stop working. Make sure your timer has an IP44 rating or higher, and consider placing it in a weatherproof box or sheltered area.
- Battery Drain (for Smart Timers): If you’re using a smart timer, the batteries may drain quickly. To avoid this, make sure your Wi-Fi connection is stable, as poor signals can cause excessive battery use. Also, regularly check the battery level to ensure continuous operation.
- Unresponsive Digital Timer: Sometimes, a digital timer may freeze or become unresponsive. Unplug it for a few minutes and restart the device to reset it.
Conclusion
Setting an outdoor lighting timer is a smart way to enhance your outdoor lighting system’s efficiency, improve security, and save on energy bills. By following the steps in this guide, you'll be able to set up, troubleshoot, and maintain your outdoor lighting timer with ease. Whether you opt for a mechanical, digital, or smart timer, understanding your needs and choosing the right timer will ensure that your outdoor lights work exactly as you want them to.
Related Articles:


 />
/>
 />
/>
 />
/>
 />
/>
 />
/>