
Best Puck Light Layouts for Kitchen Task Lighting: Spacing, Placement, and Beam Angles
Table of Contents
- Quick summary: Why puck lights matter for kitchen task lighting
- How puck lights work and common types
- Target illuminance and standards for kitchen task lighting
- General spacing rules for puck lights (quick guidance)
- Beam angle selection and effect on coverage
- Placement patterns: linear, staggered, and cluster layouts
- Calculating lumen output and expected illuminance
- Color temperature and CRI: choosing the right tone
- Installation and wiring basics for puck light systems
- Energy, durability, and maintenance considerations
- Common problems and fixes: glare, banding, and shadowing
- Comparison table: selecting puck lights by application
- Sample layout scenarios with measurements
- Cost estimation and product selection tips
- Regulations, safety, and energy rebates
- Maintenance, lifespan, and replacement strategies
- Design checklist: how to finalize your puck light layout
- FAQ — Frequently asked questions about puck light layouts
- Closing: practical next steps and quick action plan
Quick summary: Why puck lights matter for kitchen task lighting
Kitchen task lighting needs to be precise: it must deliver enough light for chopping, reading recipes, and cleaning while avoiding glare and uneven pools of light. Puck lights—compact surface- or recessed fixtures typically using LEDs—are a popular retrofit and new-construction solution because they’re inexpensive, discreet, and flexible. This guide shows how to design puck light layouts that meet recommended illuminance levels, minimize shadows, and integrate with modern kitchen design.
How puck lights work and common types
Puck lights are small round fixtures that emit a concentrated beam; they come in hardwired, plug-in, and battery-powered models, and in surface-mounted or recessed housings.
Understanding puck lights begins with these categories:
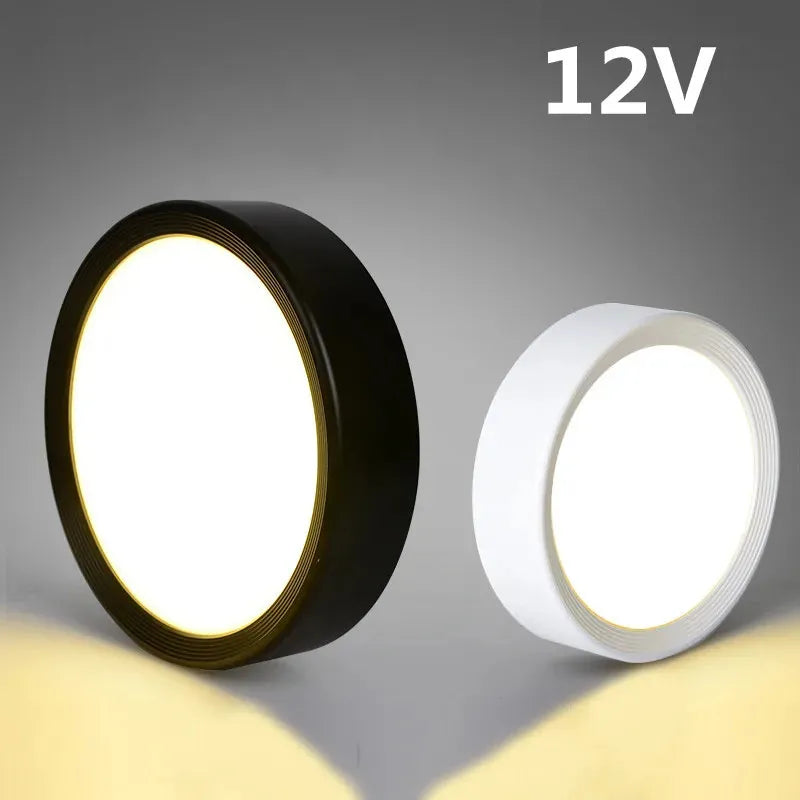
- Power type: Battery, plug-in, or hardwired (12V or 120V).
- Mounting: Surface-mounted (visible rim) vs recessed (trimless or trim).
- LED chip type: COB (chip-on-board) vs SMD (surface-mount device)—COB often gives smoother, more uniform light.
- Driver style: Built-in driver vs external transformer (common with low-voltage 12V systems).
Choosing the right combination of these elements impacts beam shape, dimming performance, heat management, and lifetime.
Target illuminance and standards for kitchen task lighting
Kitchens typically require 300–500 lux (lumens per square meter) at work surfaces; aim for the higher end for precision tasks.
Lighting professionals reference illuminance levels to select fixture output and spacing. For kitchen counters and sinks, the commonly recommended range is 300–500 lux (about 28–46 foot-candles) for general task performance. Consider 500 lux when you do fine prep or frequently read small labels. For ambient or mood lighting, much lower levels (50–150 lux) are acceptable.
Authoritative resources on residential lighting include the U.S. Department of Energy’s recommendations for efficient LED lighting and user-centered lighting design principles: U.S. DOE — Solid-State Lighting. For practical homeowner guidance on lighting choices, university cooperative extension materials can be useful: University of Minnesota Extension — Lighting.
For users aiming to meet recommended kitchen illuminance, choosing the right wattage and placement is key. 12V aluminum under cabinet LED puck lights with surface mount and multiple wattage options allow precise control over brightness and beam spread, ensuring work surfaces are well-lit for cooking and prep tasks.
General spacing rules for puck lights (quick guidance)
Spacing follows a simple rule: spacing between fixtures should be about 0.5–1.0 times the mounting height for a uniform pool of light.
Apply this rule depending on application:
- If puck lights are mounted 3 inches beneath upper cabinets, aim for spacing roughly equal to the cabinet depth (10–12 inches) for overlapping beams.
- If recessed pucks are mounted in a shallow ceiling soffit 6–8 inches above counters, spacing of 12–18 inches usually provides even coverage.
- For surface-mounted puck lights with narrower beam angles, reduce spacing to 8–12 inches to avoid dark gaps.
Practical spacing formulas
Use these quick formulas to estimate spacing:
- Spacing = Height × Beam Spread Coefficient (0.5–1.0)
- Beam Spread Coefficient ≈ 0.6 for 30° beam, 0.8 for 60° beam
- Aim for 30–60% beam overlap for smooth transitions
Beam angle selection and effect on coverage
Beam angle determines how wide a single puck’s light spreads; choose narrow angles for focused tasks and wider angles for uniform lighting.
Common beam angles for puck lights and their uses:
- 15°–24° (narrow): Accent or spotlighting—creates bright, small pools with high contrast; not ideal alone for counters.
- 30°–45° (medium): Best compromise for task lighting—good coverage with some directionality.
- 60°–120° (wide): General, even illumination—fewer fixtures needed but risk of diffuse, less intense task light.
| Beam Angle | Mounting Height (in.) | Beam Diameter (in.) | Best Use |
|---|---|---|---|
| 15° | 3" | ~1.6" | Accent on small zones |
| 30° | 3" | ~3.2" | Focused task lighting |
| 45° | 3" | ~4.8" | General task lighting—good balance |
| 60° | 3" | ~6.4" | Wide, even coverage with more overlap |
Rule of thumb: Beam diameter ≈ 2 × (mounting height × tan(beam angle/2)). This helps you size the expected light pool and determine spacing.
Placement patterns: linear, staggered, and cluster layouts
Choose a placement pattern that matches cabinet run length, sink location, and appliance layout to avoid shadowing and dark zones.
Common patterns and when to use them:
- Linear (evenly spaced): Best for continuous counter runs—easy to plan and yields uniform light.
- Staggered: Alternate pucks between two rows under cabinets to reduce shadows from hands and utensils.
- Cluster or task-focused: Concentrate pucks over chopping boards, island prep zones, or sink areas for higher intensity.
Example placements with quick specs
Here are three typical layout blueprints for a 10-foot counter run under cabinets 12 inches deep:
- Linear: 8 puck lights, 15°–45° beam, spaced 15 inches apart for 300–400 lux.
- Staggered: Two parallel rows of 6 pucks each, offset by half spacing—use 30° beams for reduced shadows.
- Cluster: 3–4 pucks above a 3-foot prep area using 45° beams and higher lumen output for 500 lux.
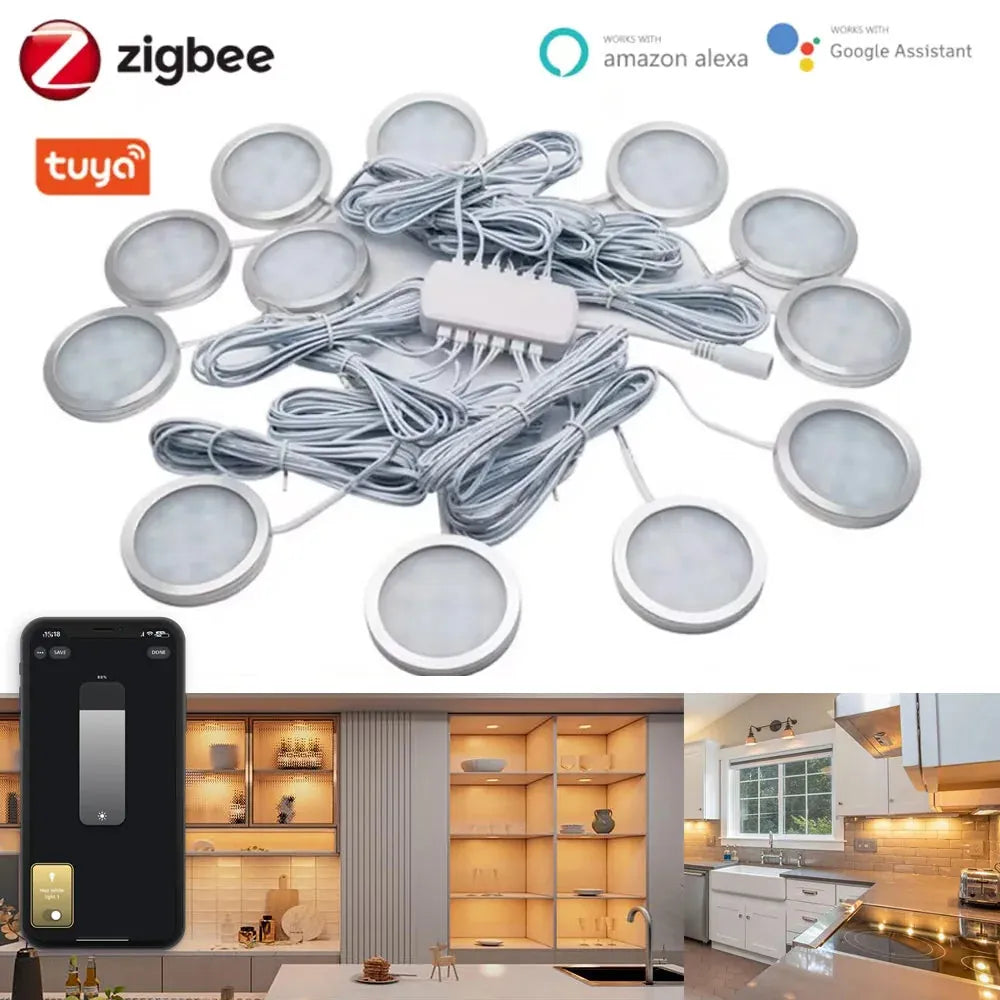
For users looking to optimize lighting across different cabinet layouts, flexible placement and easy control are essential. Tuya Zigbee Smart Under Cabinet LED Puck Lights (12V, full kit) let users arrange lights in linear, staggered, or clustered patterns while adjusting brightness and color via app or voice to eliminate shadows and highlight key work areas.
Calculating lumen output and expected illuminance
To hit target lux at the countertop, calculate required lumens per puck and adjust spacing or add fixtures accordingly.
Step-by-step simple calculation:
- Decide your target illuminance (E) in lux: e.g., 500 lux for detailed prep.
- Measure task area (A) in square meters: a 1 m × 0.6 m prep zone = 0.6 m².
- Total lumens needed (Φ) ≈ E × A ÷ utilization factor (UF). For small indirect installations, UF ≈ 0.6–0.8.
- Divide Φ by number of pucks to get lumens per fixture.
Example: For 500 lux over a 0.6 m² area with UF = 0.7: Φ ≈ 500 × 0.6 ÷ 0.7 ≈ 429 lumens total. Three pucks would need ~143 lumens each (practical LED pucks commonly range 100–400 lumens).
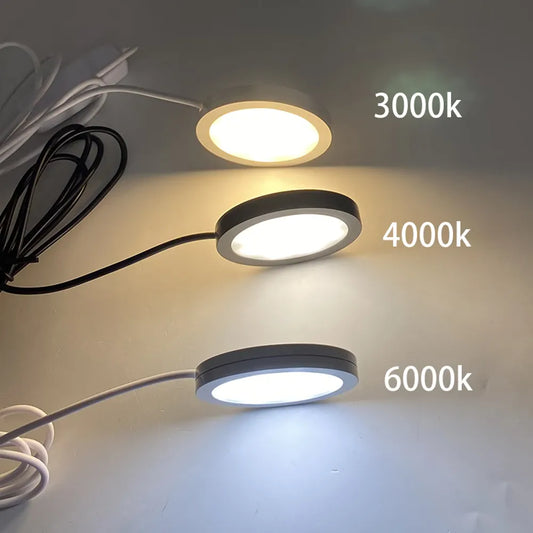
Color temperature and CRI: choosing the right tone
Color temperature affects perceived brightness and food appearance; choose 2700K–3500K for warm, natural kitchen lighting and CRI ≥90 for accurate color rendering.
Practical guidance:
- 2700K–3000K: Warm, traditional look—works well with wood tones and warm cabinetry.
- 3000K–3500K: Neutral-white—most versatile for modern kitchens and food prep.
- CRI (Color Rendering Index) ≥90: Recommended for kitchens so food and finishes look true-to-life.
Energy-efficient LED puck lights are available across these ranges. Always test a sample in your kitchen before full installation to confirm the visual result.
Installation and wiring basics for puck light systems
Installation varies by power type: plug-in models are simplest; hardwired 12V systems need a transformer and may require an electrician for code compliance.
Key steps and safety notes:
- Plan layout and measure mounting points before purchasing fixtures.
- If using 12V pucks, size the transformer: add all puck wattages + 20% buffer for longevity.
- Use dimmable drivers and LED-compatible dimmers if you want variable light levels.
- Follow local electrical code; many jurisdictions require licensed electricians for new circuits or hardwired installations.
Quick checklist:
- Confirm ceiling or cabinet clearance for recessed housings.
- Choose fire-rated housings when cutting through soffits.
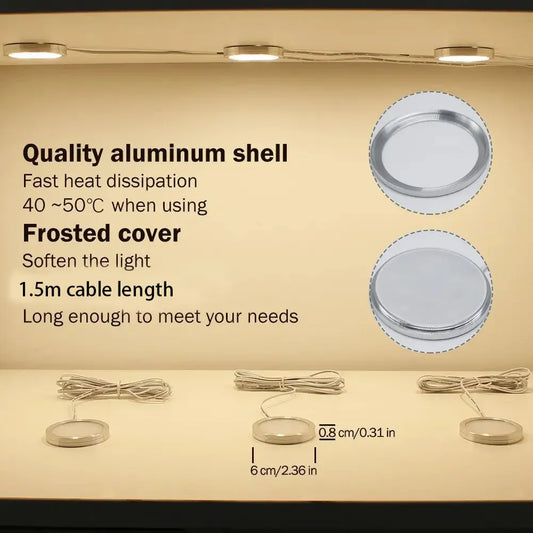
- Verify heat dissipation—COB LEDs may need more thermal management than SMDs.
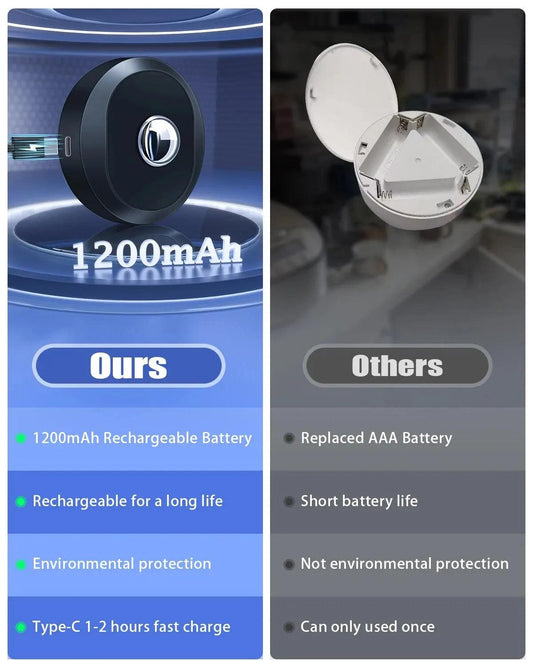
Energy, durability, and maintenance considerations
LED puck lights typically consume 3–12 W each and last 25,000–50,000 hours, making them efficient, low-maintenance choices for kitchens.
Benefits and performance metrics:
- Low energy use: LEDs use far less energy compared to halogen pucks—expect substantial savings over the fixture lifetime (see U.S. DOE guidance on LED advantages: DOE LED Lighting).
- Longevity: 25K–50K hours reduces replacement frequency—good for hard-to-reach under-cabinet positions.
- Maintenance: Wipe lenses periodically; ensure ventilation to avoid premature LED driver failure.
💡 Enjoy lasting brilliance with Lumaz LED puck lights—engineered for exceptional energy savings, superior durability, and minimal upkeep.
Common problems and fixes: glare, banding, and shadowing
Common installation mistakes cause glare, uneven pools, and visible rings; correct planning and fixture selection prevent these issues.
Troubleshooting guide:
- Glare: Use frosted lenses or narrower lumen output; lower CRI doesn’t reduce glare—change beam or angle instead.
- Banding or rings: Caused by poor optics or visible trim—choose COB with a diffuser for smoother output.
- Shadowing from hands: Reduce by staggering rows or angling pucks toward the workspace rather than straight down.
Comparison table: selecting puck lights by application
Use this quick table to match beam angle and lumen range to common kitchen tasks and layout goals.
| Application | Recommended Beam Angle | Typical Lumens per Puck | Spacing (in.) | Notes |
|---|---|---|---|---|
| Detailed prep zone | 30°–45° | 150–300 lm | 8–12 | Higher lumens, closer spacing for 400–500 lux |
| General under-cabinet run | 45°–60° | 100–200 lm | 12–18 | Aim for overlapping beams for uniformity |
| Island task cluster | 15°–45° | 200–400 lm | Variable (concentrated) | Combine spot and wider beams for depth |
| Accent or display | 15°–24° | 50–150 lm | Closer or single fixture | Use narrow beams for highlighting |
Sample layout scenarios with measurements
Below are three real-world layout examples with recommended puck counts, spacing, and beam choices for common kitchen setups.
Scenario A: Single long counter under continuous cabinetry (10 ft)
- Recommended: Linear layout
- Mounting: Pucks mounted under cabinet 3" from front edge
- Beam angle: 45° for even coverage
- Spacing: 15 inches apart (8 pucks)
- Expected result: ~300–400 lux across counter with overlap
Scenario B: Island prep zone (3 ft × 6 ft)
- Recommended: Cluster of 3 pucks centered over prep area
- Mounting: Suspended soffit or ceiling 12–18” above countertop
- Beam angle: 30°–45° with one narrower accent (15°) if you want focused cutting board light
- Spacing: Concentrated—pucks 18–24” apart center-to-center
- Expected result: 400–600 lux on work area depending on lumen output
Scenario C: Combination—sink + stove under two-cabinet runs
- Recommended: Staggered rows near sink to reduce hand shadows + linear row at stove
- Beam angle: 45° near stove for even cooking surface; 30°–45° near sink for splash-resistant focused light
- Spacing: 12–15” along each run; offset second row by half spacing where staggered
- Expected result: Minimized shadowing while allowing task-specific intensity
Cost estimation and product selection tips
Budget 3–6 times the fixture cost for professional hardwired installation where required; prioritize CRI and dimmability when selecting models.
Cost factors:
- Fixture price: $10–$60 per puck depending on features (dimmable, CRI, brand).
- Transformer/driver: $20–$100 for quality low-voltage drivers sized to load.
- Labor: $150–$500+ if hiring an electrician for wiring and cutting housings.
Product selection checklist:
- Choose LED pucks with CRI ≥90 and the desired CCT (2700K–3500K).
- Confirm dimmer compatibility—pick LED-specific dimmers for best performance.
- Match beam angle to layout goals—wide beams reduce fixture count, narrow beams increase intensity.
- Buy one or two samples and test in situ before committing to full order.
Regulations, safety, and energy rebates
Follow local electrical codes for fixture wiring; check for rebates on ENERGY STAR-rated LEDs through state or utility programs.
Helpful resources:
- Your local building code office for permitting requirements.
- ENERGY STAR and U.S. DOE pages for energy-efficient lighting standards and potential rebates: ENERGY STAR and U.S. Department of Energy.
Maintenance, lifespan, and replacement strategies
Plan for 25,000–50,000 hours of LED life, occasional lens cleaning, and driver replacement rather than whole-fixture swaps.
Maintenance tips:
- Clean lenses every 6–12 months with a soft cloth and mild cleaner.
- Monitor for flickering or color shifts—these are early signs of driver issues.
- Keep documentation and purchase a small stock of matching pucks in case a model is discontinued.
Design checklist: how to finalize your puck light layout
Use this concise checklist before buying or installing puck lights to ensure performance and satisfaction.
- Measure counters and determine target illuminance (300–500 lux).
- Decide power type (plug-in vs hardwired) and confirm local code needs.
- Choose beam angle based on spacing and whether you want focused vs uniform light.
- Select CRI ≥90 and CCT 2700K–3500K for natural color and food appearance.
- Run a prototype: install 2–3 pucks temporarily and test at night with typical tasks.
- Confirm dimmer compatibility if variable light levels are desired.
FAQ — Frequently asked questions about puck light layouts
Below are common questions homeowners and DIYers ask when planning puck light layouts for kitchen task lighting.
1. How far apart should puck lights be under cabinets?
Spacing often ranges from 8 to 18 inches depending on beam angle and mounting height. As a rule, spacing equal to cabinet depth (10–12 inches) is a good starting point for 45° beams; narrow beams require closer spacing.
2. Can I mix beam angles in one layout?
Yes. Mixing a few narrow-beam pucks with wider-beam pucks can provide both focused task light and even ambient illumination. Just test in place to avoid visible color or intensity mismatch.
3. Are 12V puck lights better than 120V models?
12V systems often offer smaller fixture profiles and safer low-voltage wiring, but they require a transformer sized to the total load. 120V pucks simplify wiring but may be bulkier. Consider electrician costs and fixture aesthetics.
4. What color temperature should I pick for kitchen task lighting?
3000K is a versatile choice—warm enough for comfortable feel but cool enough to render food and finishes accurately. Use 2700K for cozier, traditional kitchens or 3500K for a brighter, crisper look.
5. Why do my puck lights create rings or hotspots?
Hotspots are usually caused by narrow optics or lack of diffusion. Choose pucks with frosted lenses or COB LEDs with proper diffusers to produce smoother light distribution.
6. Can puck lights be dimmed with standard dimmers?
Not always. Use LED-compatible dimmers rated for the puck’s driver. Many manufacturers list compatible dimmers; verify before purchase to avoid flicker or limited dimming range.
7. How do I calculate lumens needed for my counter?
Multiply desired lux by the counter area in square meters and divide by a utilization factor (0.6–0.8). That gives total lumens. Divide by fixture count for lumens per puck. (See "Calculating lumen output" section for an example.)
8. Where can I find rebates for energy-efficient LED lighting?
Check ENERGY STAR resources and your local utility or state energy office for incentive programs; many offer rebates for high-efficiency LED fixtures or whole-home upgrades.
9. Do puck lights generate much heat under cabinets?
LED puck lights produce far less heat than halogen equivalents. Still, ensure some ventilation and avoid enclosing drivers in tight, unvented cavities to prolong driver life.
10. Should I hire an electrician or can I DIY?
Plug-in battery or corded puck lights are easy DIY. For hardwired installations, cutting into soffits, adding new circuits, or running transformers, hiring a licensed electrician ensures code compliance and safety.
Closing: practical next steps and quick action plan
Finalize your puck light layout by measuring, prototyping, and prioritizing beam angle, CRI, and driver quality. Test a small sample installation at night with real tasks before committing to bulk purchases.
Quick action plan (3 steps):
- Measure counters and choose your target lux (300–500 lux).
- Buy 2–3 sample pucks with the intended beam angle, CCT, and CRI.
- Test placement, spacing, and dimmer compatibility; then finalize full-order and installation plan with a checklist and electrical permit if needed.
Designing effective puck light layouts for kitchen task lighting is a balance of optics, spacing, and real-world testing. Follow the spacing rules, choose appropriate beam angles, prioritize CRI and dimmability, and you’ll end up with functional, attractive, and energy-efficient kitchen task lighting.
Further Reading
Explore the full guide for this topic: Puck Lights for Kitchens, Cabinets, Displays, and Specialty Applications
Related Articles
- Hardwired vs Plug-In vs Battery Puck Lights: Which Installation Option Is Right?
- Childproof and Tamper-Resistant Puck Lighting Solutions for Daycares and Family Homes
- Heat Management in Enclosed Cabinets: Preventing Puck Light Overheating and Driver Failure
- Puck Lights for Retail Displays: Color Rendering, Security Mounts


 />
/>
 />
/>
 />
/>
 />
/>
 />
/>