
How To Install Under Cabinet Lighting - Step-by-Step Guides
Table of Contents
- Pre‑Install: Safety, Codes, and Scope
- Tools and Materials Checklist
- Plug‑In Installation — Step‑by‑Step
- Battery‑Powered Installation — Step‑by‑Step
- Hardwired Low‑Voltage Installation — Step‑by‑Step
- Measuring, Marking, and Mounting
- Cable Routing and Driver Placement
- Dimming and Control Setup
- Commissioning: Light‑Level and Glare Tests
- Troubleshooting Quick Fixes
- Maintenance and Upkeep
- FAQs
- Conclusion
Pre‑Install: Safety, Codes, and Scope
This guide focuses on how to install under cabinet lighting step‑by‑step. Choose a method that fits your wiring access, timeline, and skills, and follow safety guidance.
Safety essentials
- Turn off power at the breaker before any electrical work.
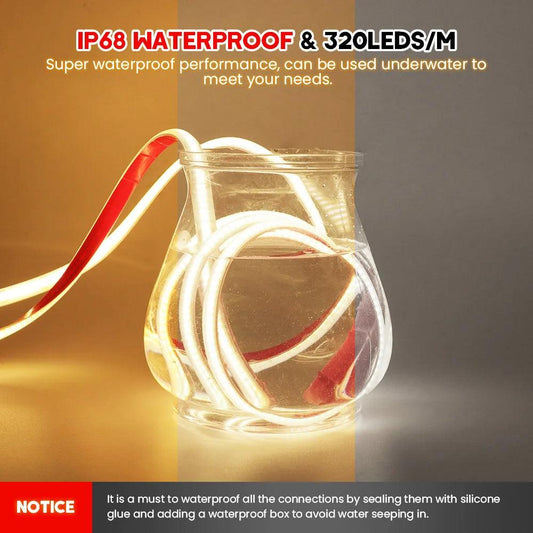
- Use UL‑listed fixtures, drivers, cords, and dimmers rated for your load.
- Keep cords clear of heat sources; avoid pinch points and abrasive edges.
Tools and Materials Checklist
Gather tools and hardware before mounting. Pre‑staging reduces rework and keeps the install clean.
Tools
- Measuring tape, pencil, level, non‑contact voltage tester
- Drill/driver, small bits, screw set, cable clips
- Wire strippers/crimpers (for low‑voltage wiring)
- Adhesive raceways, corner connectors, Velcro ties
- Optional: phone lux app for simple light‑level checks
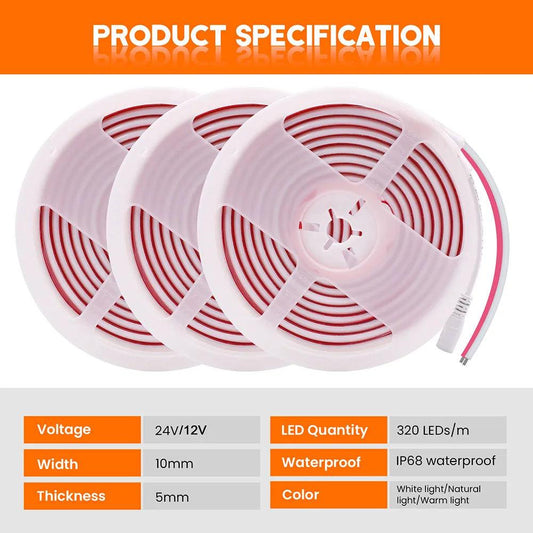
Materials
- Under cabinet LED bars or high‑density strips with diffusers
- Mount channels/brackets sized to cabinet runs
- Drivers/adapters (plug‑in or low‑voltage) rated with 10–20% headroom
- Dimmers/controls: inline, touch, motion, or wall dimmers
- Cable management: clips, raceways, grommets
Plug‑In Installation — Step‑by‑Step
Plug‑in installs are fast and non‑invasive. Use neat cable routing and a matched inline dimmer for professional results.
Steps
- Plan runs and outlets. Identify the outlet closest to your cabinet run.
- Measure cabinet underside; mark mounting lines 1–2 inches behind front lip.
- Mount channels/brackets. Keep segments continuous; avoid diffuser gaps > 1 inch.
- Attach bars/strips to mounts; check alignment and diffuser continuity.
- Route cables along undersides using clips and adhesive raceways.
- Install inline dimmer between adapter and fixture lead; secure excess cable.
- Plug in; restore power; test brightness and glare with overheads off.
- Tidy cables; label dimmer presets for day vs night scenes.
Tips
- Use right‑angle plugs to reduce protrusion near backsplashes.
- Hide adapters in cabinets where heat buildup is minimal and airflow is adequate.
- Keep cords away from hot appliances; inspect for abrasion monthly.
👨🍳 “Our plug‑in bars took under an hour to install. With raceways and clips, the wiring looks invisible and the dimmer gives perfect evening light.”
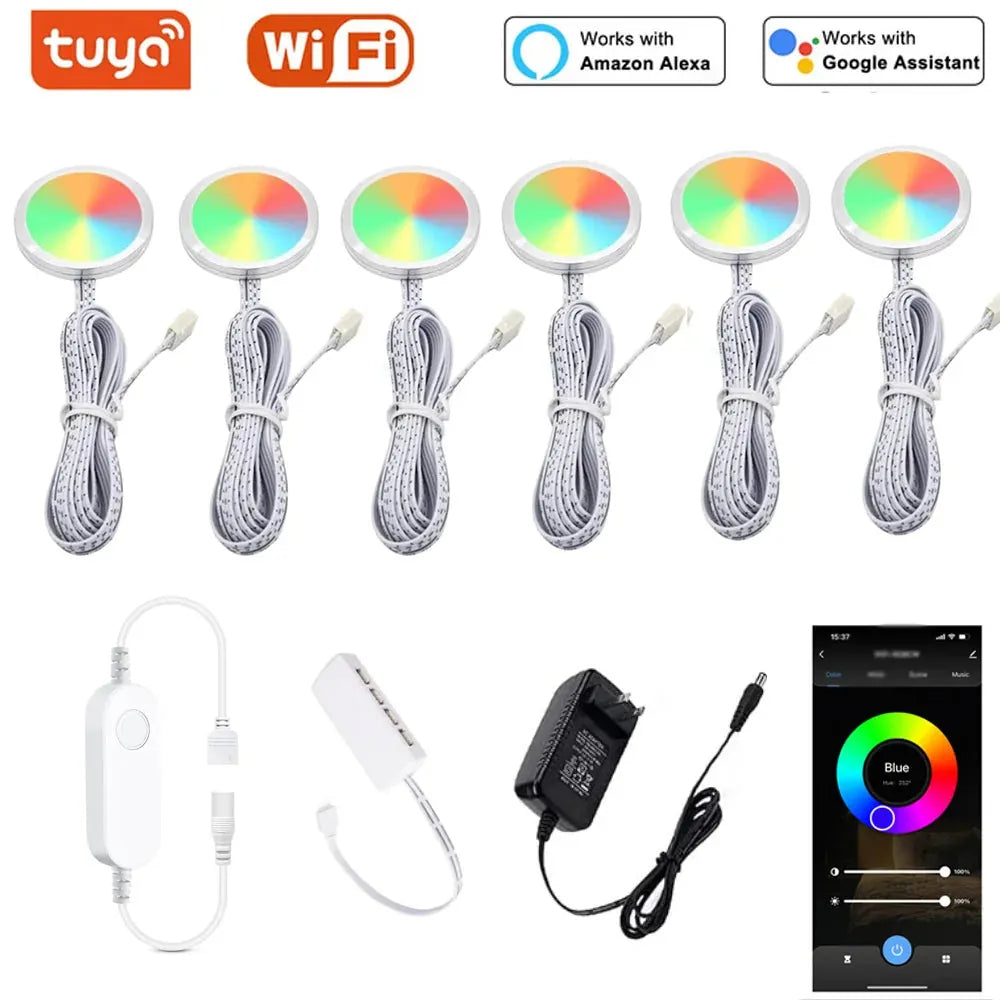
Plug-in installation offers a simple, non-invasive way to enhance your space with under cabinet lighting. For added convenience and control, the Tuya WiFi RGB Under Cabinet LED Puck Lights provide app and voice control, allowing you to easily adjust the lighting’s color and brightness, ideal for creating customizable ambiance in kitchens or workspaces.
Battery‑Powered Installation — Step‑by‑Step
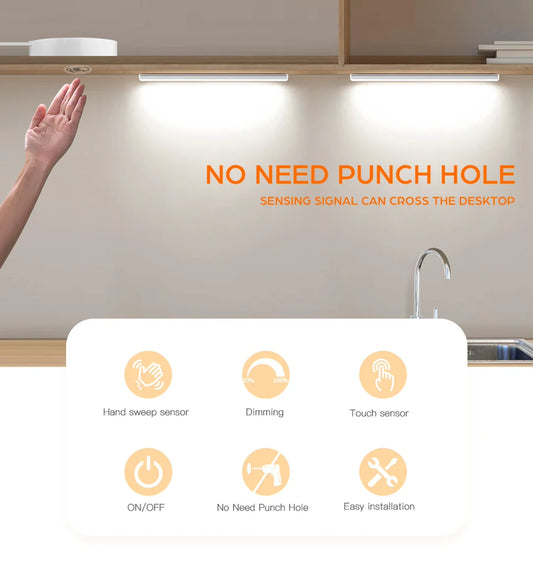
Battery lights suit rentals and quick projects. Magnetic mounts and touch/motion controls keep the workflow simple.
Steps
- Charge bars fully; verify indicators and control mode (touch or motion).
- Measure and mark mounting lines 1–2 inches behind the front lip.
- Place magnetic pads or brackets; ensure straight alignment across runs.
- Snap bars in place; test activation and brightness.
- Set motion sensitivity and delay (e.g., 30–120 seconds) for traffic patterns.
- Label positions for easy swapping when charging.
Tips
- Prefer USB‑C recharge and battery indicators for predictable maintenance.
- Plan a weekly charging rotation during daytime to maintain coverage.
- Keep a spare charged unit for high‑traffic sinks or passthroughs.
Battery-powered installation offers flexibility and ease, especially in spaces where wiring isn't feasible. The Type-C Rechargeable Under Cabinet LED Light Bar, featuring a smart motion sensor and three color options, provides a convenient, energy-efficient solution for kitchens or desks, ensuring the right lighting when you need it most.

Hardwired Low‑Voltage Installation — Step‑by‑Step
Hardwired systems deliver the cleanest look. Pair listed drivers and dimmers, route cables behind cabinets, and confirm code compliance.
Steps
- Turn off power at the breaker; verify with a non‑contact tester.
- Plan driver location in a reachable, ventilated space (e.g., cabinet interior).
- Size driver to total wattage with 10–20% headroom; match dimmer type (TRIAC/ELV/0–10V).
- Measure and mark 1–2 inch setback; mount channels/brackets along each cabinet run.
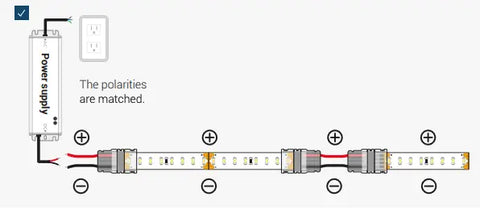
- Wire fixtures in parallel for uniform brightness; use appropriate gauge (e.g., 16–18 AWG).
- Route low‑voltage cables through grommets; secure cables with clips; avoid sharp edges.
- Connect driver to supply per listing; install dimmer per instructions; restore power.
- Test low‑end dimming; adjust pairing if flicker or noise occurs.
Notes
- Use junction boxes and listed connectors; follow local code rules.
- Test GFCI function near sinks; label circuits for future service.
- Document wattage, lengths, and presets for handover.
For lighting and efficiency guidance, see U.S. DOE — Energy Saver.
Measuring, Marking, and Mounting
Accurate measuring and clean mounts prevent shadow seams and glare. Keep coverage continuous and setback consistent.
Procedure
- Measure cabinet widths per box; map obstacles (brackets, braces, hood gaps).
- Mark straight lines 1–2 inches behind the front cabinet lip for fixture placement.
- Pre‑fit segments and corner connectors to confirm continuity.
- Mount channels/brackets; verify level and tightness; avoid over‑torquing.
- Install bars/strips; test diffuser joints; correct misalignment before routing cables.
Mount hardware reference
| Hardware | Best Use | Pros | Considerations |
|---|---|---|---|
| Aluminum channel + frosted lens | LED strip runs | Clean optics, heat control | Measure precisely; avoid gaps |
| Low‑profile brackets | Linear LED bars | Fast install, secure | Check level across segments |
| Magnetic pads | Battery bars | Tool‑free, removable | Align carefully to prevent sag |
| Adhesive raceways | Cable routing | Neat, paintable | Clean surface before adhesion |
💡 Measure once, mount clean. With Lumaz channels and low‑profile brackets, your install stays tidy, optics stay smooth, and every run looks purpose‑built.
Cable Routing and Driver Placement
Plan cable paths to keep wiring invisible and strain‑free. Place drivers where ventilation and access are safe.
Routing patterns
- Route along cabinet undersides; use clips at corners to prevent droop.
- Use adhesive raceways along wall returns; paintable for discretion.
- Protect cables with grommets when passing through wood or metal.
Driver placement
- Choose ventilated, reachable locations; avoid heat traps.
- Label output channels; leave slack for maintenance.
- Secure adapters; verify strain relief and cord routing.
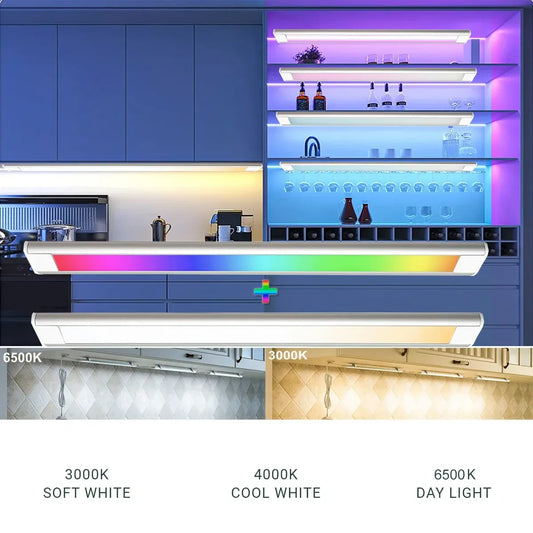
Dimming and Control Setup
Match dimmers and drivers to the fixture type. Tune minimum levels and scenes for daily use.
Setup
- Inline dimmer: install between adapter and fixture; secure with clips.
- Touch/motion control: set sensitivity and delay for traffic patterns.
- Wall dimmer: match driver type (TRIAC/ELV/0–10V) for smooth low‑end.
Tuning
- Test low‑end for flicker or color shift; adjust pairing if needed.
- Store presets for cooking (bright), evening (low), and night navigation (very low).
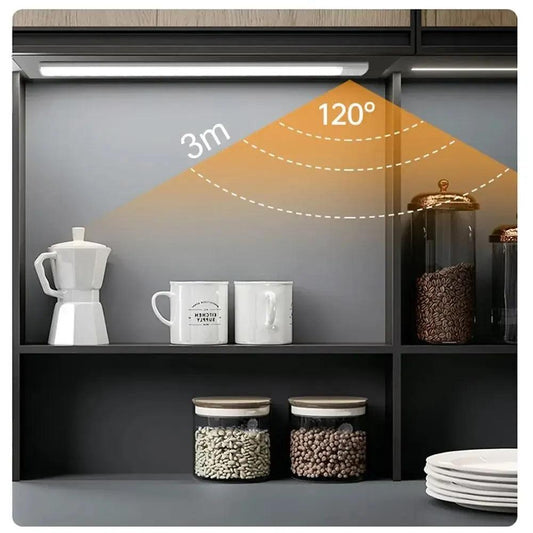
Commissioning: Light‑Level and Glare Tests
Before finalizing mounts, test brightness, uniformity, and reflections. Adjust placement or diffusion to eliminate hot spots.
Quick tests
- Lux check: phone app for relative readings at common prep areas.
- Glare check: turn off overheads and inspect backsplash/counter reflections.
- Uniformity: verify continuous light with no hard shadow seams.
Troubleshooting Quick Fixes
Use these targeted fixes to resolve common install issues quickly.
Issues and actions
- Flicker at low dimming: check driver/dimmer compatibility; set higher minimum.
- Visible LED dots: add frosted lens or increase setback slightly.
- Backsplash glare: aim beams forward; reduce output for evening scenes.
- Uneven brightness: re‑seat connectors; verify parallel wiring; minimize long low‑voltage runs.
- Loose cables: add clips and raceways; confirm strain relief at adapters.
Maintenance and Upkeep
Plan simple maintenance to keep the install safe and consistent.
- Quarterly: inspect clips, raceways, and cord strain relief.
- Monthly: wipe diffusers; check motion/touch sensitivity and timer settings.
- Battery bars: rotate charging on a weekly schedule; keep a spare unit ready.
FAQs
Can I Daisy Chain Under Cabinet Lights?
Yes, you can daisy chain under cabinet lights by connecting multiple lights in series using a single power source. This method simplifies wiring, reduces clutter, and ensures consistent lighting, making it an efficient option for many setups.
Do under cabinet lights go in front or back?
Under cabinet lights are best placed towards the front of the cabinet. This position maximizes countertop illumination, reduces shadows, and ensures well-lit workspaces, which is why experts generally recommend front placement.
Should I Hire an Electrician to Install Under Cabinet Lighting?
Whether you need an electrician depends on the type of under cabinet lighting. Plug-in or battery-operated lights can be DIY, but hardwired installations typically require an electrician for safety and code compliance.
Do Under Cabinet LED Lights Need a Transformer?
Yes, under cabinet LED lights usually need a transformer to provide the correct voltage and ensure proper performance. Always use the transformer recommended by the manufacturer for best results.
Do You Need a Valance for Under Cabinet Lighting?
A valance isn't required for under cabinet lighting, but it can improve both aesthetics and functionality by concealing fixtures, reducing glare, and protecting against dust and grease.
Does Under Cabinet Lighting Need a Switch?
Yes, under cabinet lighting benefits from having a switch, offering convenience, energy efficiency, and better control. Choose a switch type that suits your needs and enhances your kitchen's functionality.
Conclusion
Installing under cabinet lighting can significantly enhance the functionality and aesthetic of your space. By following the proper steps—whether it's plug-in, battery-powered, or hardwired—along with careful attention to safety, measurements, and wiring, you can achieve a seamless installation. Ensuring proper dimming and control setup, as well as testing for light levels and glare, will optimize your lighting for both comfort and efficiency. With regular maintenance, your under cabinet lights will continue to brighten your space for years to come.
Further Reading
Explore the full guide for this topic: Under Cabinet Lighting Installation: What’s Possible in Your Home
Related Articles
- How to Install Under Cabinet LED Strip Lighting?
- Wireless Under Cabinet Lighting: Best Options and Installation Tips
- Do You Need an Electrician to Install Under Cabinet Lighting?
- Where Should Under Cabinet Lights Be Mounted?
- Cabinet Lighting FAQ: Wiring, Dimming, and Best Placement for Small Kitchens


 />
/>
 />
/>
 />
/>
 />
/>
 />
/>