
Unterbaubeleuchtung: Was ist in Ihrem Zuhause möglich?
Inhaltsverzeichnis
- Einleitung: Warum Unterbauleuchten ein Wendepunkt für moderne Haushalte sind
- Beurteilung Ihres Raumes: Was bestimmt Ihre Installationsmöglichkeiten?
- Die drei wichtigsten Installationsmethoden: Festverdrahtung, Netzanschluss und Batteriebetrieb
- Festverdrahtete Installation: Der „Goldstandard“ für nahtlose Integration
- Plug-in-Lösungen: Die perfekte Balance aus Leistung und Benutzerfreundlichkeit
- Kabellose und batteriebetriebene Beleuchtung: Ideal für Mieter und schnelle Reparaturen
- Layoutstrategien: Wo Sie Ihre Leuchten für maximale Wirkung positionieren sollten
- Lichtsteuerung: Von physischen Schaltern bis zur Smart-Home-Integration
- Heimwerker oder professioneller Elektriker: Die richtige Wahl treffen
- Häufige Installationsfehler und wie man sie vermeidet
- Kurzübersicht: Ihr Leitfaden für eine hellere Küche
- Häufig gestellte Fragen
- Abschluss
Einleitung: Warum Unterbauleuchten ein Wendepunkt für moderne Haushalte sind
Die Unterbaubeleuchtung verbessert sowohl die Funktionalität als auch die Atmosphäre. Sie beseitigt Schatten auf der Arbeitsfläche für mehr Sicherheit beim Kochen und sorgt für ein sanftes Abendlicht, das der Küche ein elegantes und harmonisches Ambiente verleiht.
Doppelwirkung
- Funktional: Aufgabenbezogene Klarheit bei Zählern zum Schneiden, Ablesen und Messen.
- Ästhetik: Weiches, diffuses Licht, das Oberflächen aufwertet und die Stimmung verbessert.
- Entscheidungsschwerpunkt: Dieser Leitfaden bewertet, was in Ihrem Zuhause realistisch installierbar ist.
Beurteilung Ihres Raumes: Was bestimmt Ihre Installationsmöglichkeiten?
Beginnen Sie mit einer kurzen Bestandsaufnahme. Stromanschluss, Schrankgeometrie und Reflexionsgrad der Arbeitsplatte bestimmen, was Sie installieren können und wie sauber das Endergebnis aussehen wird.
Checkliste für die Standortprüfung
- Steckdosen: Standorte und Stromkreisverfügbarkeit beachten; Schalteranschlüsse bei festverdrahteten Optionen identifizieren.
- Schranköffnung: Messen Sie die Tiefe an der Unterseite; schmale Beschläge (≤ 0,8 Zoll) lassen sich besser verbergen.
- Frontlippe: Planen Sie einen Abstand von 1–2 Zoll von der Vorderkante ein, um eine optimale Spreizung zu erzielen.
- Reflexionsgrad der Arbeitsplatte: Glänzender Stein benötigt Diffusoren, um Hotspots und Blendung zu vermeiden.
- Wege: Spülbecken, Vorbereitungsbereiche, Geräteablagen und Eckanschlüsse.
Materielle Erwägungen
- Ob Stein oder Edelstahl: Für eine weiche Lichtverteilung sind mattierte Linsen und ein breiterer Abstrahlwinkel vorzuziehen.
- Matte Oberflächen: Sie akzeptieren etwas schmalere Lichtstrahlen ohne Glanz.
- Oberflächenbehandlung der Küchenrückwand: Helle Farben werden stärker reflektiert; die Lichtstärke kann durch Dimmen angepasst werden.
Die drei wichtigsten Installationsmethoden: Festverdrahtung, Netzanschluss und Batteriebetrieb
Drei Lösungswege decken die meisten Haushalte ab. Festverdrahtet bietet die eleganteste Optik, steckerfertig bietet ein ausgewogenes Verhältnis zwischen Geschwindigkeit und Leistung, und batteriebetrieben eignet sich für Mietwohnungen oder schnelle Lösungen.
Methodenvergleich
| Verfahren | Installationskomplexität | Visuelle Sauberkeit | Bedienelemente | Wartung | Am besten geeignet für |
|---|---|---|---|---|---|
| Festverdrahtet | Hohe (Elektroarbeiten) | Ausgezeichnet (keine sichtbaren Kabel) | Wanddimmer, einheitliches Schalten | Niedrig | Umbauten, dauerhafte Modernisierungen |
| Plug-in | Niedrig bis mittel | Gut (verkabeltes System) | Inline-Dimmer, lokale Schalter | Medium | Vorhandene Steckdosen, minimale Verkabelung |
| Batterie | Niedrig | Gut (keine Kabel) | Berührungs-/Autosensoren | Höher (Laden) | Mietflächen, Nutzflächen |
Für den entsprechenden Kontext siehe US DOE — Energy Codes und OSHA — Electrical Safety .
Detaillierter Einblick:
- Anleitung zur Installation von Unterbauleuchten – Schritt-für-Schritt-Anleitung
- So installieren Sie festverdrahtete Unterbauleuchten: Eine Schritt-für-Schritt-Anleitung
Festverdrahtete Installation: Der „Goldstandard“ für nahtlose Integration
Festverdrahtete Systeme ermöglichen eine unsichtbare Verkabelung und eine einheitliche Steuerung. Sie eignen sich ideal für Umbauten oder Neubauten, wenn die Kabelverlegung und das Hinzufügen von Dimmern praktikabel sind.
Warum es sich von anderen abhebt
- Klare Ästhetik: Kabel in Schränken oder Wänden versteckt; keine herabhängenden Kabel.
- Einheitliche Szenen: Wanddimmer sind mit anderen Ebenen abgestimmt und sorgen so für harmonische Abende.
- Langlebigkeit: robuste Treiber, weniger Anschlüsse und minimaler Wartungsaufwand.
Details zur Implementierung
- Planen Sie separate Stromkreise und Niederspannungstreiber, die auf die Gesamtleistung ausgelegt sind.
- Verwenden Sie Anschlussdosen und zugelassene Steckverbinder; beachten Sie die örtlichen Vorschriften und die NEC-Grundsätze.
- Die Leuchten sollten 1–2 Zoll von der Vorderkante entfernt montiert werden; die Segmente sollten mit minimalen Spalten verbunden werden.
Sicherheitshinweis
- Beauftragen Sie für Neuverkabelungen oder Schaltschrankarbeiten einen zugelassenen Elektriker; prüfen Sie gegebenenfalls die erforderlichen Genehmigungen.
- Stromkreise kennzeichnen und FI-Schutzschalter dort testen, wo Wasser vorhanden ist (z. B. in der Nähe von Waschbecken).
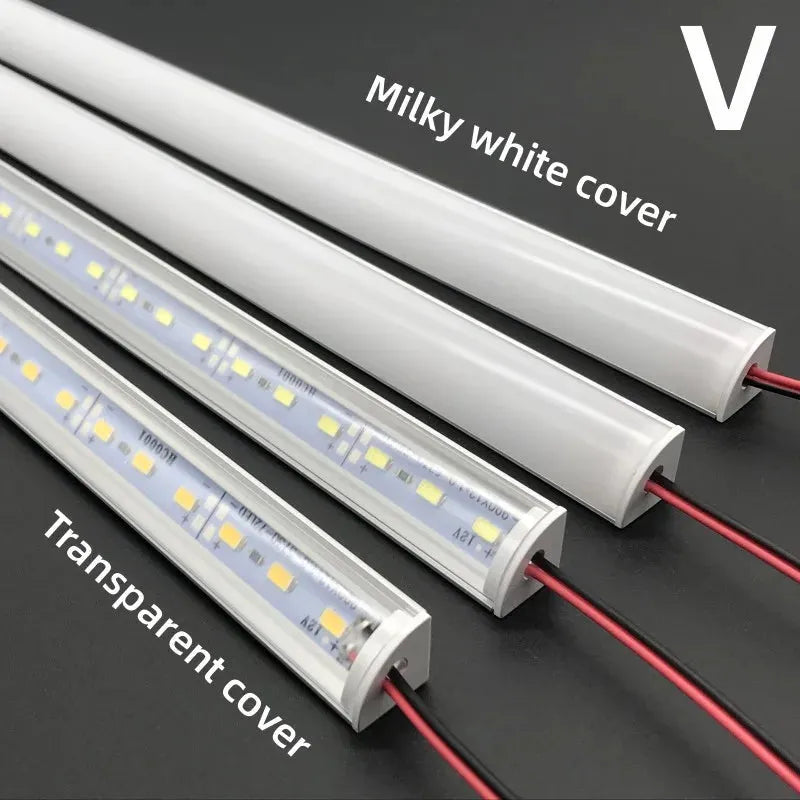
Für eine saubere und dauerhafte Beleuchtungslösung gilt die Festverdrahtung oft als Goldstandard für eine nahtlose Integration. Die V-förmige LED-Unterbauleuchte mit ihrem 12-V-Aluminiumprofil und 36 LEDs sorgt für eine gleichmäßige und effiziente Ausleuchtung und garantiert ein elegantes, integriertes Erscheinungsbild, das die Gesamtästhetik Ihrer Küche oder Ihres Arbeitsbereichs aufwertet.
Plug-in-Lösungen: Die perfekte Balance aus Leistung und Benutzerfreundlichkeit
Steckdosenleisten und -leisten nutzen vorhandene Steckdosen für eine schnelle Installation. Dank Kabelmanagement und integrierter Dimmer wirken sie ordentlich und funktionieren wie fest installierte Systeme.
Bewährte Verfahren
- Verwenden Sie Winkelstecker und verlegen Sie die Kabel mit Klemmen an der Unterseite entlang.
- Adapter sollten nach Möglichkeit in Schränken versteckt werden; Wärmefallen sollten vermieden werden.
- Kombinieren Sie die Leuchte mit Touch-/Inline-Dimmern; stellen Sie für optimalen Komfort Tag- bzw. Nacht-Voreinstellungen ein.
🙂 „Wir haben in weniger als einer Stunde Steckdosenleisten unter zwei Schränken angebracht. Mit ordentlichen Kabelclips und einem kleinen Dimmer sehen die Arbeitsflächen professionell beleuchtet aus – und ein Elektrikerbesuch war nicht nötig.“
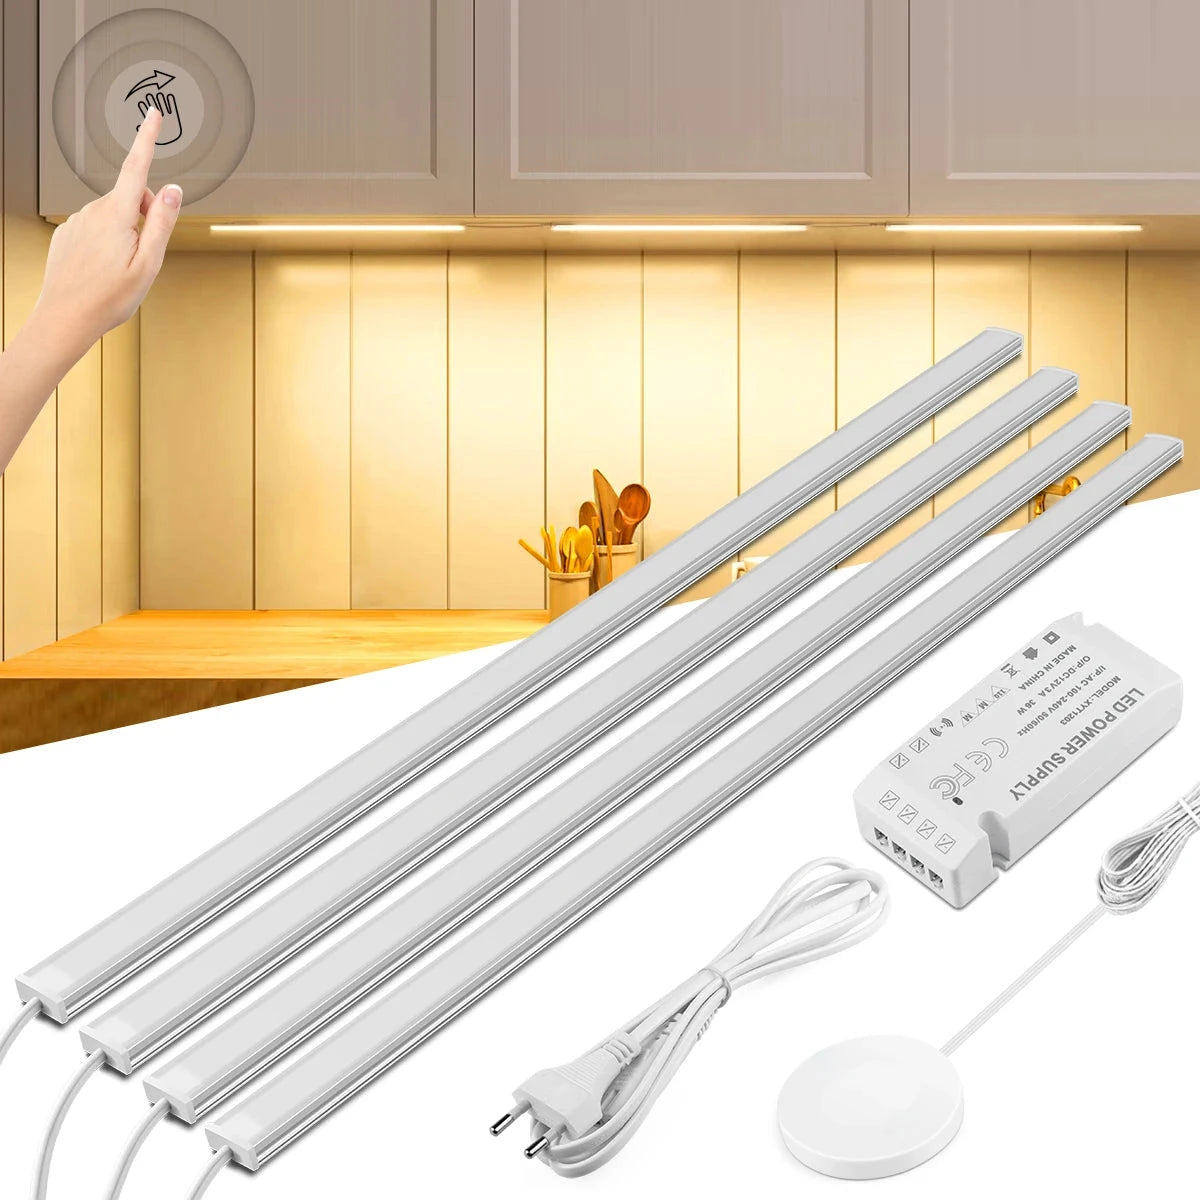
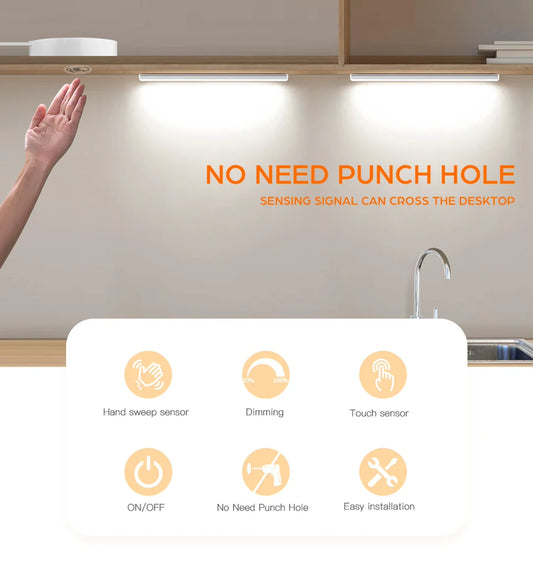
Für Anwender, die eine einfach zu installierende Lösung suchen, bietet die Touch & Hand Sweep Sensor LED-Lichtleiste für Unterschränke eine Installationsmethode ohne Bohren und ist somit ideal für Bereiche wie Küchen oder Schreibtische geeignet. Sie bietet optimale Beleuchtung, ohne Oberflächen zu beschädigen.
Kabellose und batteriebetriebene Beleuchtung: Ideal für Mieter und schnelle Reparaturen
Batteriebetriebene Leuchten lassen sich schnell montieren und erfordern kein Bohren. Sie eignen sich für Mietwohnungen, Vorratskammern und Hauswirtschaftsräume, in denen Steckdosen rar sind und Flexibilität wichtig ist.
Auswahltipps
- Wählen Sie Magnetleisten für eine werkzeuglose Montage und einfaches Aufladen.
- PIR-Bewegungsmelder mit einstellbarer Verzögerung sind vorzuziehen; hohe Empfindlichkeit in der Nähe von Haustieren sollte vermieden werden.
- Verwenden Sie diffuse Linsen, um nachts eine weiche und blendfreie Sicht zu gewährleisten.
Abwägungen
- Ladezyklen bedeuten zusätzlichen Wartungsaufwand; halten Sie Ersatzgeräte für eine unterbrechungsfreie Versorgung bereit.
- Geringere Leistung kann die Einsatzmöglichkeiten einschränken; ideal für Navigation und Akzentuierung.
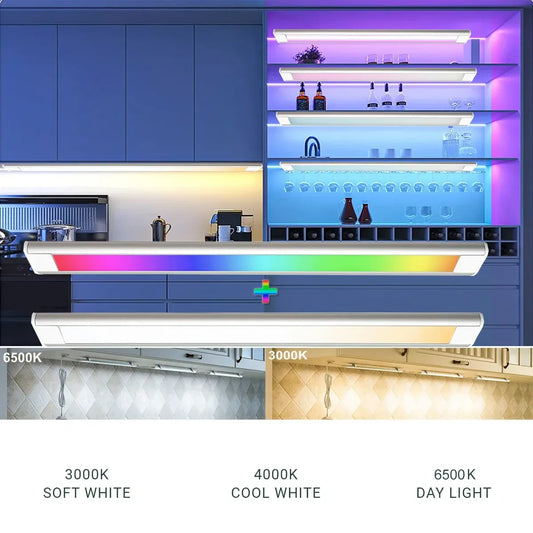
Für Mieter oder alle, die ihre Beleuchtung schnell und unkompliziert modernisieren möchten, ist die wiederaufladbare LED-Unterbauleuchte mit USB-C-Anschluss die ideale Lösung. Dank des intelligenten Bewegungssensors und drei Farboptionen lässt sie sich flexibel und einfach ohne feste Verkabelung installieren – perfekt für eine effiziente und individuell anpassbare Beleuchtung in Küchen oder Wohnräumen.

Layoutstrategien: Wo Sie Ihre Leuchten für maximale Wirkung positionieren sollten
Die Platzierung bestimmt Komfort und Klarheit. Frontseitig angebrachte Leuchten, eine kontinuierliche Ausleuchtung und eine intelligente Eckbeleuchtung vermeiden Schatten ohne Blendung.
Numerische Faustregeln
- Vorderer Abstand: 1–2 Zoll hinter der Schrankfront für optimale Erreichbarkeit der Arbeitsfläche.
- Gleichmäßigkeit: Diffusorspalte > 1 Zoll vermeiden; ein Hell-Dunkel-Verhältnis von ≤ 3:1 anstreben.
- Lichtstromdichte: 300–500 Lumen/Fuß für Arbeitsschichten; gedimmt für Abendszenen.
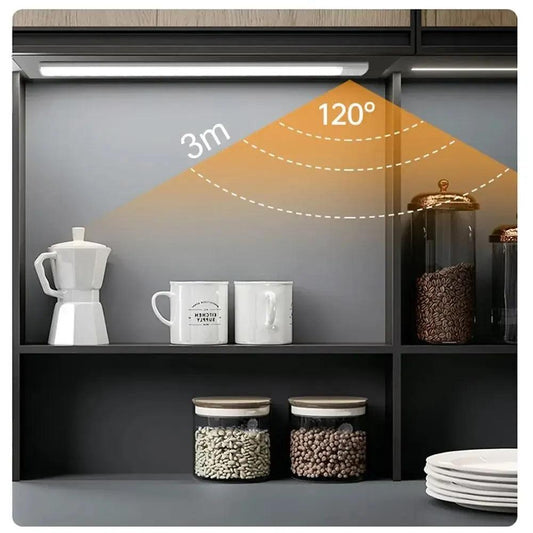
- Abstrahlwinkel: 60–120 Grad; breitere Strahlen für glänzende Theken.
Eck- und tiefe Thekenlösungen
- Verwenden Sie kurze Verbindungsstücke oder Eckverbinder, um Lücken zwischen Spülbecken und Dunstabzugshaube zu überbrücken.
- Bei tiefen Theken ist eine Platzierung im vorderen Bereich und eine höhere Lichtstreuung zur Erreichung der Arbeitsfläche vorzuziehen.
Detaillierter Einblick:
Lichtsteuerung: Von physischen Schaltern bis zur Smart-Home-Integration
Die Steuerungsmöglichkeiten reichen von einfachen Schaltern bis hin zu sprachgesteuerten Szenen. Dimm-, Bewegungs- und Berührungssensoren passen die Lichtleistung an Tageszeit und Aktivität an.
Steuerungstypen
- Wanddimmer: Ebenen vereinheitlichen und Szenenhelligkeit schnell anpassen.
- Berührungs-/Wischsensoren: Hygienische Kontrolle in der Nähe von Zubereitungszonen.
- Bewegungssensoren: automatisches Ein-/Ausschalten für Spülbecken und Durchreichen.
- Smart Home: Steuern Sie Ihre Beleuchtung per Alexa/Google über Routinen und schaffen Sie so freihändige Szenen.
💡 Intelligente Steuerung für intelligenteres Licht. Mit Lumaz LEDs sorgen präzise Dimmung und sanftes Schalten für Komfort und Energieeinsparung – so wirkt Ihre Küche hell, wenn Sie es brauchen, und beruhigend, wenn nicht.
Für einen Überblick über die Installationssicherheit siehe OSHA Electrical .
Heimwerker oder professioneller Elektriker: Die richtige Wahl treffen
Entscheiden Sie anhand des Risikos, der Vorschriften und der verfügbaren Werkzeuge. Einfache Installationen mit Stecker oder Batterie sind für Heimwerker geeignet; Neuverkabelungen und Schaltschrankarbeiten erfordern einen zugelassenen Elektriker.
Entscheidungscheckliste
- Umfang: Werden Steckdosen hinzugefügt, Kabel in der Wand verlegt oder Stromkreise modifiziert?
- Einhaltung der Vorschriften: Lokale Bauvorschriften und NEC-Grundsätze prüfen; gegebenenfalls Genehmigungen einholen.
- Sicherheit: FI-Schutzschalter in der Nähe von Spülbecken, korrekter Kabelquerschnitt, geeignete Anschlussdosen.
- Werkzeuge: Bohrmaschine, Kabelklemmen, Niederspannungstreiber-Dimensionierung, Durchgangsprüfer.
Detaillierter Einblick:
Häufige Installationsfehler und wie man sie vermeidet
Die meisten Probleme entstehen durch falsche Positionierung, ungünstige Optik und unpassende Farben. Diese lassen sich durch einen Abstand zur Front, Diffusionsfilter sowie eine gleichmäßige Temperaturregelung beheben.
Fallstricke
- Rückseitig montierte Leuchten verursachen Blendeffekte an der Küchenrückwand und beeinträchtigen die Erreichbarkeit von Arbeitsflächen.
- Freiliegende LED-Punkte spiegeln sich auf glänzenden Theken.
- Durch unterschiedliche Farbtemperaturen in den einzelnen Schichten entsteht ein „zweifarbiger“ Weißton.
- Überlastete Treiber oder falsch dimensionierte Kabel bei Heimwerkerprojekten.
Behebt
- Platzieren Sie die Leuchten 2,5 bis 5 cm von der Vorderseite entfernt; verwenden Sie Streulinsen.
- 3000–3500K über alle Ebenen hinweg angleichen; CRI ≥ 90 für bessere Verständlichkeit der Aufgabe bevorzugen.
- Dimensionieren Sie die Treiber entsprechend der Gesamtleistung mit einem Spielraum von 10–20 %; überprüfen Sie die Anschlüsse.
Kurzübersicht: Ihr Leitfaden für eine hellere Küche
Diese Checkliste fasst Entscheidungen zu Raumanalyse, Methodenauswahl, Layout und Steuerung zusammen. Befolgen Sie sie, um eine sichere, saubere und komfortable Beleuchtung zu gewährleisten.
- Leistungsaufnahme, Schrankgeometrie und Reflexionsgrad der Arbeitsplatte prüfen.
- Methode wählen: Festverdrahtet für dauerhafte Lösung, steckbar für Geschwindigkeit, batteriebetrieben für Flexibilität.
- Platzierung: 1–2 Zoll Rücksprung vorne; durchgehende Abdeckung mit minimalen Lücken.
- Optik auswählen: Streulinsen; Abstrahlwinkel 60–120 Grad.
- Farbanpassung: 3000–3500 K; CRI ≥ 90 für optimale Lesbarkeit.
- Bedienelemente konfigurieren: Dimmer, Berührung, Bewegung oder intelligente Routinen.
- Entscheiden Sie sich selbst oder für einen Fachmann: Einhaltung der Bauvorschriften, Genehmigungen und Schutzausrüstung.
- Test bei Nacht: Helligkeit anpassen, um Blendeffekte zu reduzieren; Voreinstellungen dokumentieren.
Häufig gestellte Fragen
Diese Antworten klären häufige Fragen zur Installation und behandeln Sonderfälle. Sie helfen Ihnen, Methoden und Steuerungselemente auszuwählen, die sicher und sauber in Ihr Zuhause passen.
Kann ich Unterbauleuchten ohne Steckdose installieren?
Ja. Verwenden Sie batteriebetriebene Magnetleisten oder verlegen Sie ein unauffälliges Kabel zu einer nahegelegenen Steckdose. Für eine feste Verkabelung beauftragen Sie einen zugelassenen Elektriker, der gemäß den geltenden Vorschriften eine Steckdose installiert.
Welche Farbtemperatur sollte ich für Küchen wählen?
Für eine ansprechende Klarheit sollte die Farbtemperatur in allen Ebenen zwischen 3000 und 3500 Kelvin liegen. In den Arbeitsbereichen sollte der Farbwiedergabeindex (CRI) mindestens 90 betragen, um eine präzise Farbwiedergabe und gut sichtbare Kanten zu gewährleisten.
Wo genau soll ich die Leuchten montieren?
Montieren Sie den Diffusor 2,5–5 cm hinter der vorderen Schrankkante. Halten Sie den Abstand zwischen Diffusor und Wand kleiner als 2,5 cm und richten Sie die Lichtkegel nicht auf reflektierende Oberflächen.
Sind Bewegungsmelder unter Schränken sinnvoll?
Ja. Sie bieten eine berührungslose Bedienung an Spülbecken und Durchreichen. Verwenden Sie einstellbare Verzögerungen und eine moderate Empfindlichkeit, um Fehlauslösungen zu vermeiden.
Benötige ich für festverdrahtete Installationen einen Fachmann?
Für Neuverkabelung, Schaltschrankarbeiten oder die Verlegung von Leitungen in Wänden sollten Sie einen zugelassenen Elektriker beauftragen. Bei steckerfertigen und batteriebetriebenen Systemen ist die Selbstinstallation mit ordnungsgemäßem Kabelmanagement in Ordnung.
Abschluss
Unterbauleuchten können Ihr Zuhause verändern und bieten sowohl praktisches Licht als auch ästhetische Vorteile. Ob Sie sich für festverdrahtete, steckbare oder batteriebetriebene Lösungen entscheiden – die Kenntnis Ihrer Raumgegebenheiten und der Installationsmethoden hilft Ihnen, optimale Ergebnisse zu erzielen. Mit sorgfältiger Planung von Layout und Steuerungsmöglichkeiten lässt sich die Beleuchtung nahtlos in Ihr Zuhause integrieren und verbessert so Funktionalität und Atmosphäre. Ob Sie die Installation selbst durchführen oder einen Fachmann beauftragen: Wenn Sie häufige Fehler vermeiden, verläuft die Installation reibungslos und führt zu einem helleren und effizienteren Raum.
Nach Berücksichtigung aller genannten Faktoren können Sie auf unserer Übersichtsseite für Unterbauleuchten weitere Produktoptionen und detaillierte Kaufberatungen entdecken, um die beste Lösung für Ihre Bedürfnisse zu finden.
Weitere Leitfäden zu diesem Thema
- Wie platziert man Unterbauleuchten?
- Wie installiert man LED-Streifenbeleuchtung unter Küchenschränken?
- Kabellose Unterbauleuchten: Die besten Optionen und Installationstipps
Verwandte Beleuchtungsratgeber
- Unterbauleuchten für jeden Wohnbereich: Küchen, Regale, Schreibtische und Schränke
- So wählen Sie die richtige Unterbaubeleuchtung: Ein umfassender Entscheidungsleitfaden
- Lichtqualität für Unterbauleuchten: Farbe, Helligkeit und Komfort
- Vollständiger Leitfaden für intelligente Unterbaubeleuchtung: Steuerung, Sensoren & Automatisierung
- Leben mit Unterbauleuchten: Langlebigkeit, Sicherheit & Wartung


 />
/>
 />
/>
 />
/>
 />
/>
 />
/>