
Under Cabinet Lighting for Any Home Space: Kitchens, Shelves, Desks, and Cabinets
Table of Contents
- What Is Under Cabinet Lighting and Why It’s Used Across Home Spaces
- Core Lighting Goals by Usage Scenario (Task, Accent, Navigation)
- Under Cabinet Lighting in Kitchens: Layouts for Counters, Prep Zones, and Islands
- How to Light Kitchen Cabinets with Different Depths and Structures
- Under Shelf Lighting for Open Shelves and Display Storage
- Under Cabinet Lighting for Desks and Home Workstations
- Lighting Inside Cabinets, Closets, and Enclosed Storage
- Small-Space Solutions: Lighting for Tight, Awkward, or Low-Clearance Areas
- Choosing the Right Lighting Layout: Strip, Bar, or Point-Based Placement
- Color Temperature and Brightness Choices by Room Function
- Power and Control Considerations by Scenario (Hardwired, Plug-In, Motion, Smart)
- Common Under Cabinet Lighting Layout Mistakes and How to Avoid Them
- Planning an Under Cabinet Lighting Setup for Your Home
- FAQs
- Conclusion
What Is Under Cabinet Lighting and Why It’s Used Across Home Spaces
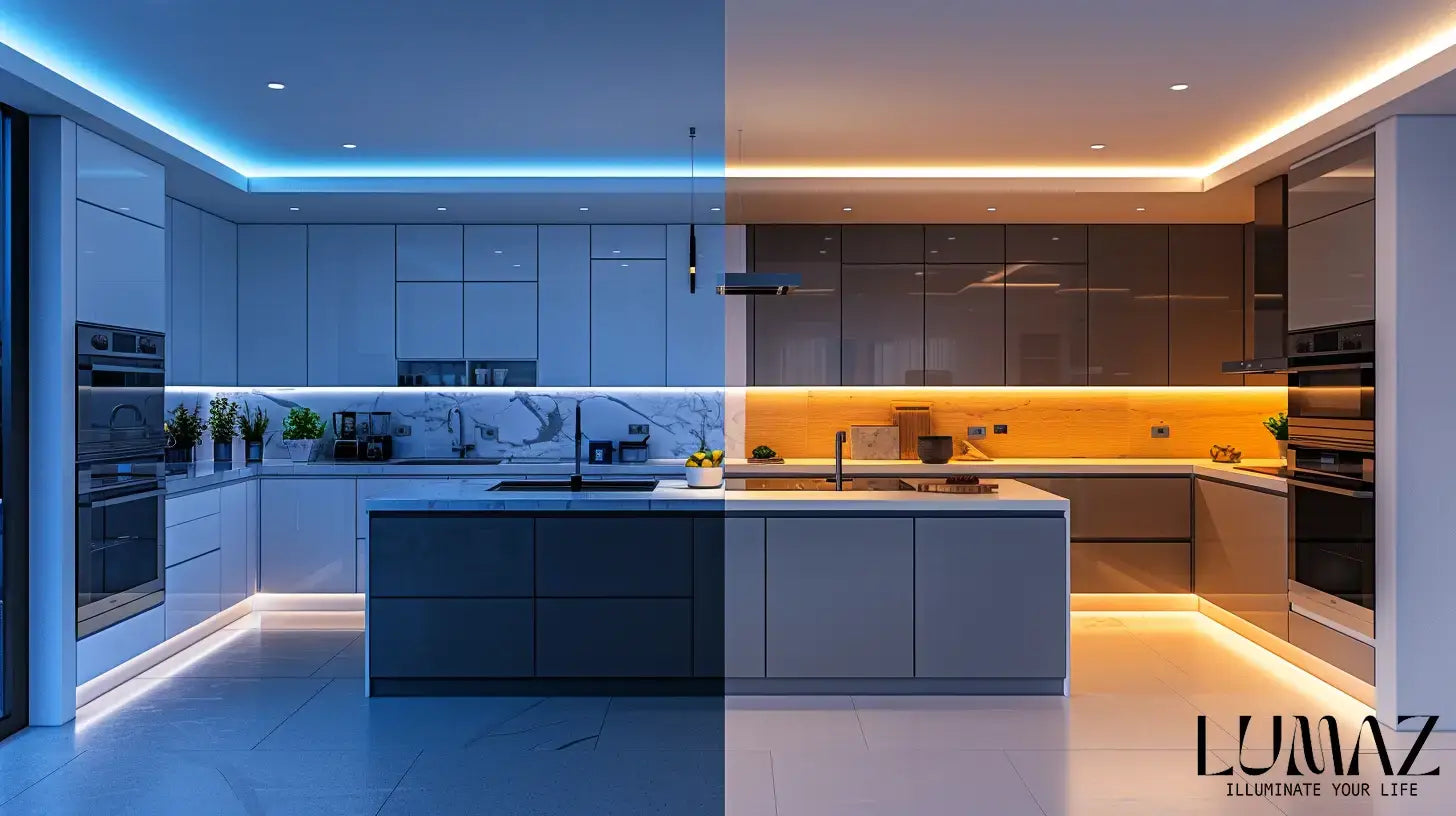
Under cabinet lighting is a directed, low-glare lighting layer mounted beneath shelves, cabinets, or overhangs to illuminate the surfaces below. It enhances visibility, comfort, and aesthetics in kitchens, desks, open shelves, closets, and storage.
This layer complements ambient and accent light by placing brightness exactly where tasks occur. LEDs are preferred due to high efficiency, long life, and directional output that reduces wasted light and heat.
Layering and Integration
- Ambient light sets overall room levels; under cabinet lighting fills shadowed task planes for clarity.
- Accent light adds visual interest; under cabinet lighting can double as subtle accent with lower output.
- Directionality matters: LEDs emit light where you aim them, minimizing spill and improving efficiency.
Benefits vs. Overhead Only
- Reduces shadows caused by upper-body occlusion under overhead fixtures.
- Lowers glare on glossy countertops by moving the source closer and using diffusion.
- Improves perceived brightness with less energy due to proximity and directionality.
Core Lighting Goals by Usage Scenario (Task, Accent, Navigation)
Before choosing fixtures, define the goal: high-clarity task work, soft accent glow, or safe nighttime navigation. The goal determines brightness, color, optics, and placement across different home spaces.
Goal Definitions
- Task: Bright, uniform illumination for food prep, paperwork, craft work, and reading labels.
- Accent: Subtle, warm glow to highlight materials, décor, and architectural details without glare.
- Navigation: Very low-level light for safe movement at night that preserves circadian comfort.
Design Rules
- Task setups favor front-edge placement and higher output; dimming maintains comfort and reduces eye strain.
- Accent setups use diffusion, warmer color (2700–3000K), and lower output to flatter materials.
- Navigation setups prioritize motion sensors and low brightness to avoid startling occupants.
Measurement Guidance
- Task planes: Aim for ~30–50 foot-candles on counters or desk surfaces.
- Accent planes: ~5–15 foot-candles with diffusion to prevent sparkle on glossy finishes.
- Night paths: ~1–5 foot-candles; motion activation minimizes energy and sleep disruption.
Examples by Space
- Kitchens: Task-first with scene dimming; coordinate with can lights and pendants.
- Shelves: Accent-first; warmer tones and lower output to flatter materials.
- Desks: Task-first; neutral tones and higher CRI to avoid color shift on documents.
Under Cabinet Lighting in Kitchens: Layouts for Counters, Prep Zones, and Islands
Kitchen lighting focuses on shadow-free counters and cohesive scenes with ambient fixtures. Use continuous strips or evenly spaced bars near the front lip to illuminate the working surface and minimize backsplash glare.
Countertop Layouts
- Continuous runs: End-to-end LED strips in channels for seamless coverage and hidden diodes.
- Bar segments: Evenly spaced bars with slight beam overlap to avoid visible seams.
- Front-edge rule: Mount within ~1–2 inches of the cabinet front for optimal task illumination.
Prep Zones and Islands
- Prep zones: Higher-output bars or dual-row strips; target ~30–50 foot-candles on the counter.
- Islands: Under-counter bars complement pendants; tune dimming to avoid specular glare on stone.
- Scene presets: “Prep”, “Serve”, and “Evening” dimming levels for comfort and energy savings.
Coordinate color temperature (e.g., 3000–3500K) and CRI (≥90) with overhead fixtures to keep surfaces natural and consistent.
Layout Examples
- Run length: For 8–12 ft counters, choose continuous strips with power injection every 8–10 ft to avoid voltage drop.
- Bars: Space 12–18 in apart with slight beam overlap; use diffusers for glossy splashbacks.
- Island overhangs: Mount bars under the lip facing inwards; tune dimming to eliminate specular glare.
Coordination with Ambient
- Match CCT across cans, pendants, and under cabinets to avoid mixed tones.
- Use lower ambient levels during task-focused cooking; under cabinet lighting carries the workload efficiently.
- Scene presets synchronize dimming between layers for quick transitions.
Detailed Insight:
How to Light Kitchen Cabinets with Different Depths and Structures
Cabinet depth, construction (framed vs. frameless), and bottom profile affect fixture choice and placement. Shallow cabinets favor slim strips; deeper counters may require higher-output bars or dual rows for uniform reach.
Adaptation Rules
- Shallow (≤12 in): Slim strips with diffusers at the front edge reduce shadows and visible diodes.
- Deep (≥24 in): Bars with optics or dual-row strips improve reach to the front counter edge.
- Framed vs. frameless: Use clips/channels aligned to the reveal for tidy alignment and cable concealment.
Uneven Bottoms and Obstacles
- Level with shims or select adjustable clips; pre-test placement with painter’s tape to identify shadow lines.
- Route cords inside cabinets with strain relief; avoid exposed conductors near metal cabinetry.
- Add diffusion lenses to soften bright points on glossy backsplashes.
Practical Measurements
- Front-edge install: 1–2 in from the lip for optimal coverage on 24 in deep counters.
- Dual-row option: One row at front, one mid-depth for deep counters or dark surfaces.
- Driver placement: Inside cabinet with ventilation; follow listing and thermal guidelines.
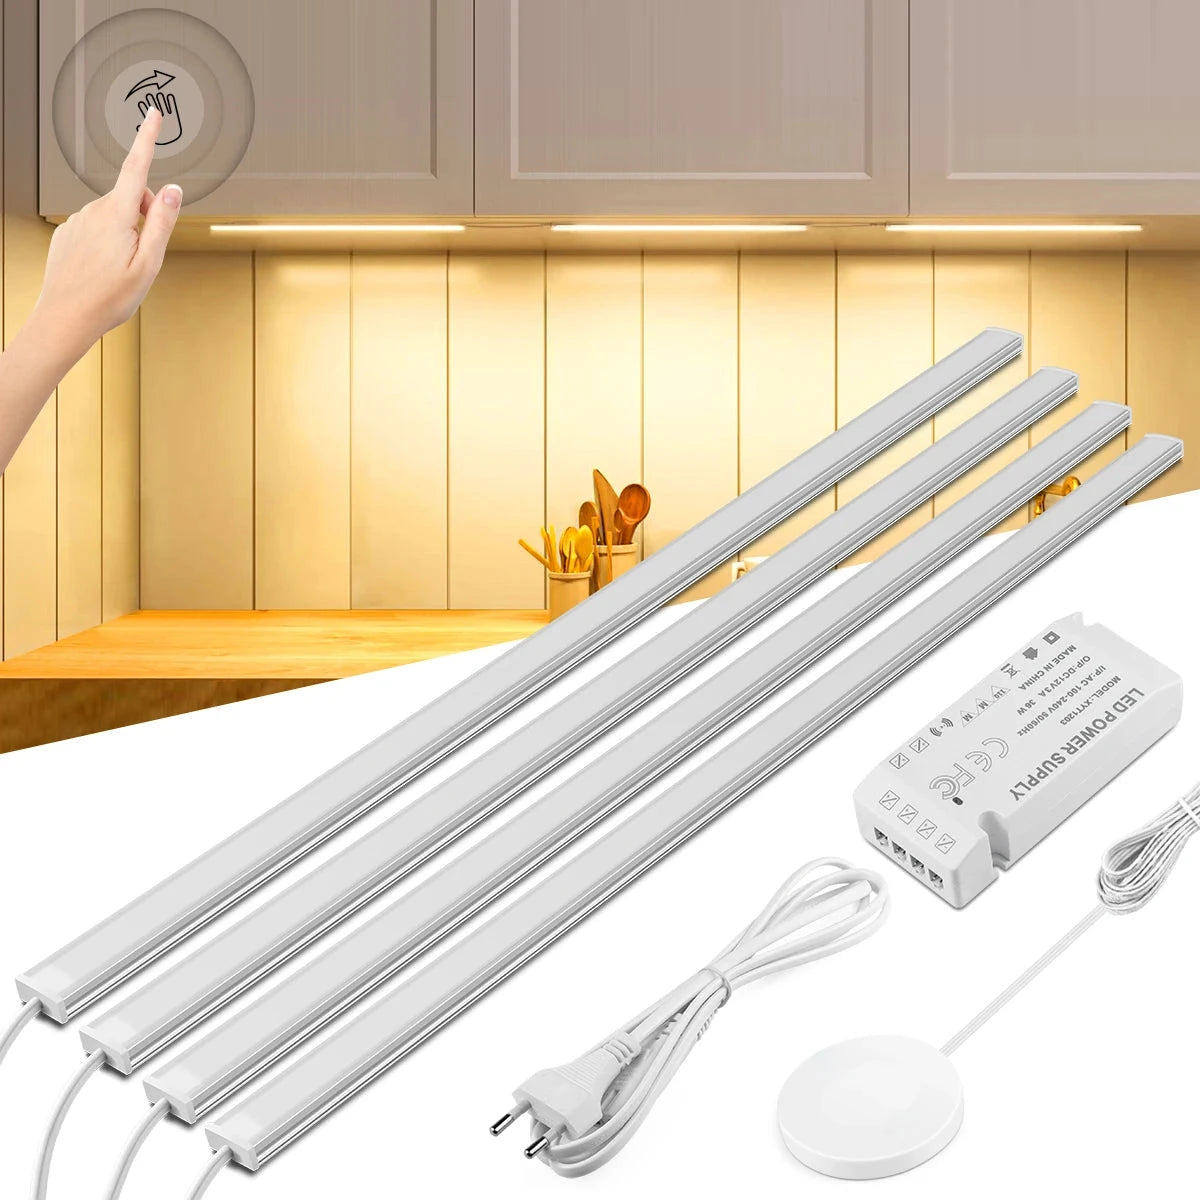
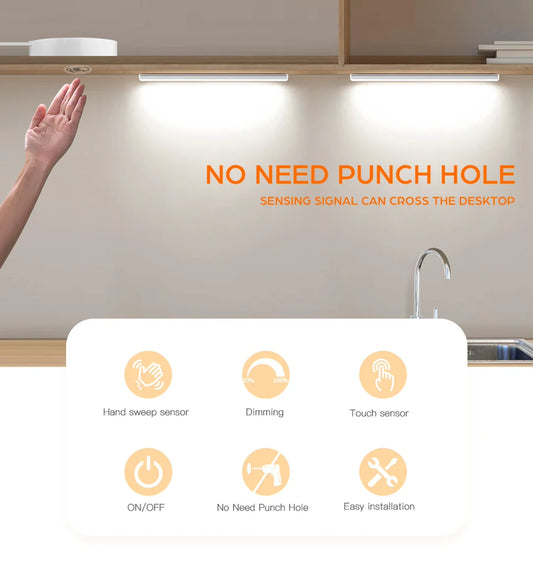
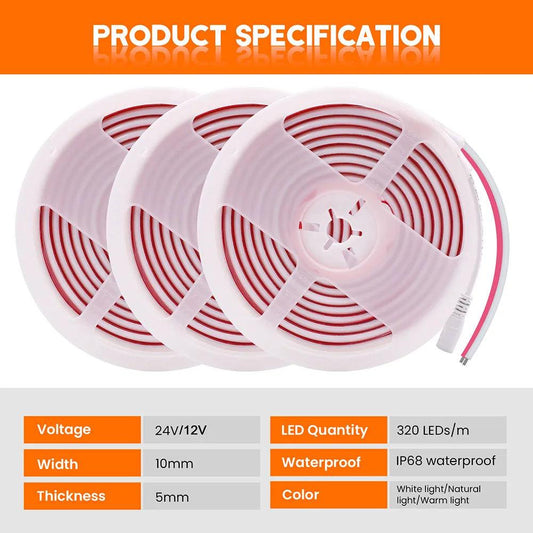
For kitchens with varying cabinet depths and structures, the Touch & Hand Sweep Sensor Under Cabinet LED Light Bar provides a flexible lighting solution. Its ultra-thin design fits seamlessly under shallow cabinets, while its no-drill installation ensures easy placement even in framed or frameless cabinets. The touch-sensitive feature allows for effortless control, offering efficient task lighting across your kitchen's unique layout.
Under Shelf Lighting for Open Shelves and Display Storage
Open shelves call for soft, even light that flatters materials and avoids direct emitter glare. Use diffused strips or low-output bars toward the front edge and keep sightlines clean.
Display Guidance
- Materials: Warm 2700–3000K enhances wood and ceramics; CRI ≥90 preserves color fidelity of books and décor.
- Placement: Set strips inside channels to hide diodes; angle slightly toward items to reduce reflections.
- Brightness: Use lower output for ambience; add dimming to fine-tune for day vs. evening.
For everyday storage or pantry display, motion sensors keep light off when not in use, saving energy and battery cycles.
Glare Control and Protection
- Use channels with frosted lenses to hide LEDs and avoid sparkle on glass or gloss.
- Mount slightly recessed under shelves to shield emitters from direct view.
- Select warm CCT to enhance wood grains and ceramics without washing out colors.
Detailed Insight:
Under Cabinet Lighting for Desks and Home Workstations
Desk setups need shadow-free task light that reduces monitor glare and eye strain. Neutral color temperatures maintain focus and accurate color reproduction for paper and screens.
Desk Rules
- Set 3000–3500K and CRI ≥90 to render graphics and text naturally.
- Mount near the front lip and angle down to prevent reflections on glossy surfaces.
- Use dimming for switching between reading, writing, and video calls.
Pair desk under-lighting with reduced overhead output to minimize glare and support longer sessions comfortably.
Ergonomics and Focus
- Place fixtures to avoid casting hand shadows during writing or typing.
- Set brightness just above ambient to balance contrast without eye fatigue.
- For video calls, a soft fill from under-shelf lighting reduces harsh shadows on faces.
Detailed Insight:
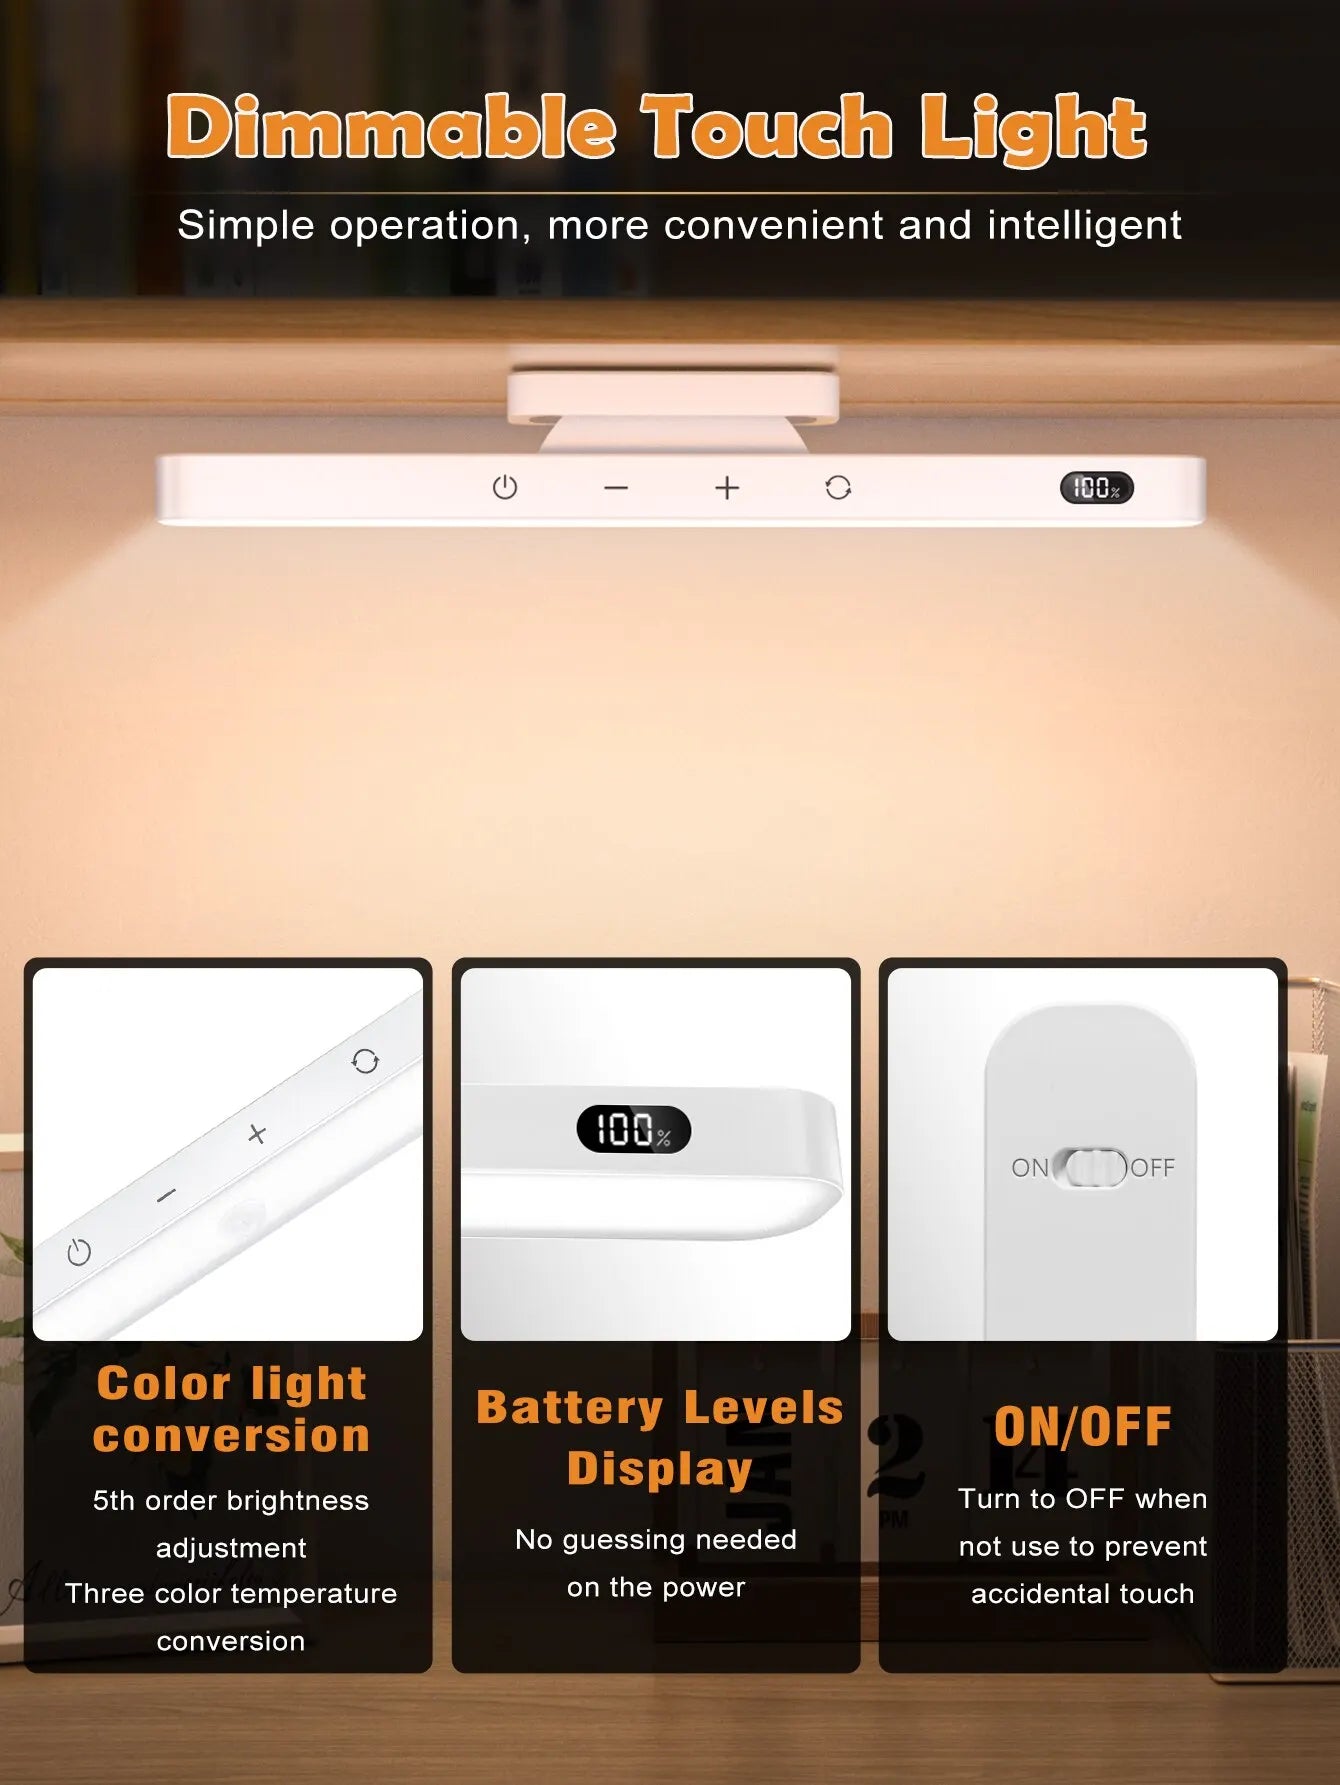
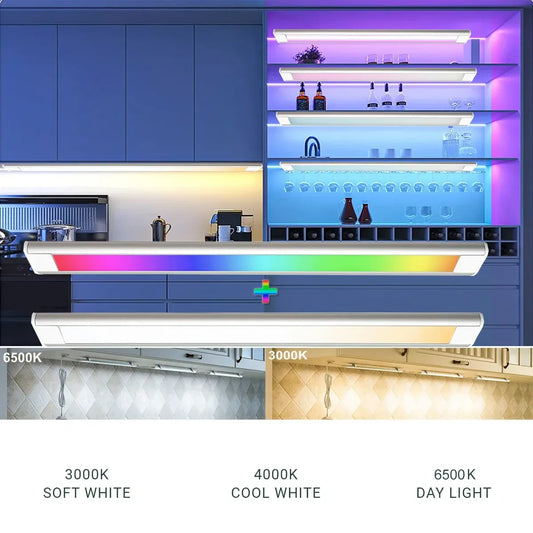
For a clutter-free and versatile workspace, the 2500mAh Rechargeable Under Cabinet LED Light Bar with three-color lighting and magnetic base provides adjustable illumination, perfect for focused tasks. Its rechargeable feature ensures convenience, while the magnetic base allows flexible placement, making it an ideal addition to any desk or home workstation.
Lighting Inside Cabinets, Closets, and Enclosed Storage
Internal lighting increases visibility for items stored in cabinets, closets, and pantries. Activation methods should be automatic and unobtrusive, with low profile fixtures that avoid blocking storage.
Activation Methods
- Door switches: Lights turn on only when doors open; ideal for closets and pantries.
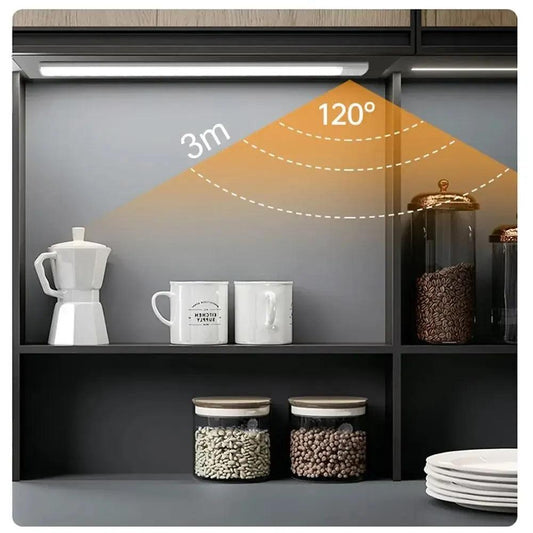
- Passive infrared motion: Hands-free activation for quick access; set suitable timeout and sensitivity.
- Rechargeable bars: Simple installs where outlets are unavailable; plan weekly charging routines.
Placement Strategies
- Vertical mounting near hinge sides for uniform shelf illumination.
- Low-profile strips along inner frames to avoid direct eye-level glare.
- Diffused optics to reduce bright points on reflective packaging.
Sensor Tuning
- Set motion sensitivity to medium to avoid false triggers from pets or hallway traffic.
- Use shorter timeouts (e.g., 30–60 seconds) in closets to save energy.
- For pantries, choose door switches to ensure activation only when needed.
Detailed Insight:
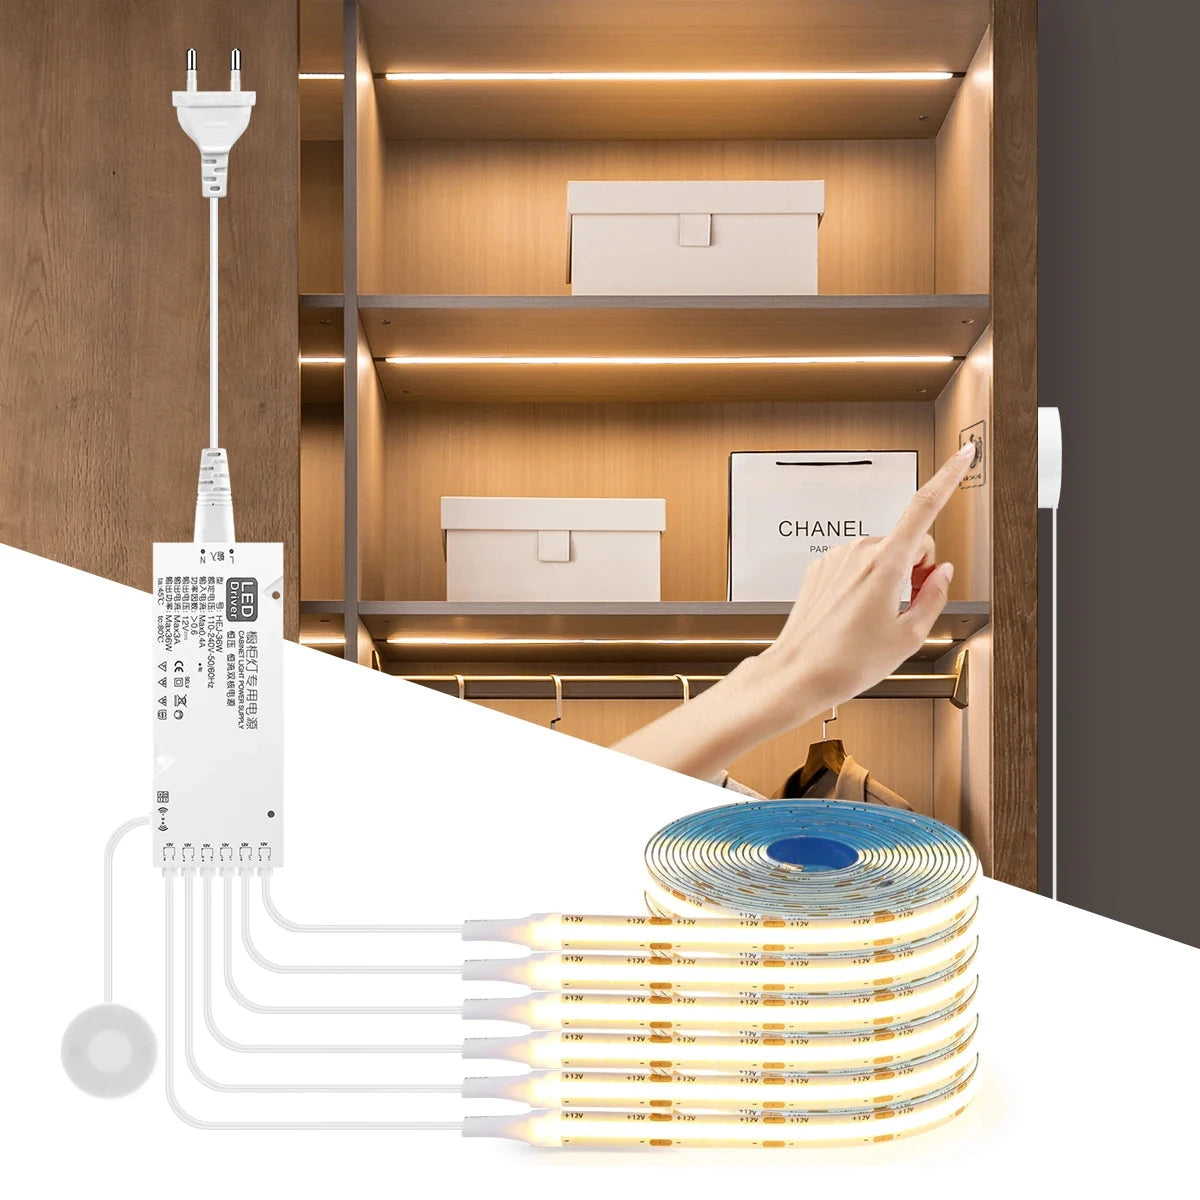
For efficient and even lighting inside cabinets or closets, the Through-Wood Touch Sensor COB LED Strip Light provides seamless, dimmable illumination. Its ultra-thin design ensures unobtrusive placement, while the touch sensor activation offers a hassle-free, energy-efficient lighting solution for enclosed spaces.
Small-Space Solutions: Lighting for Tight, Awkward, or Low-Clearance Areas
Compact homes, apartments, and RVs benefit from ultra-thin fixtures, adhesive or magnetic mounts, and efficient power. Cordless solutions and smart controls minimize clutter and simplify installation.
Constraints and Fixes
- Low clearance: Ultra-thin strips; conceal wiring in channels or under lips.
- Limited power: Rechargeable bars with motion to extend runtime and reduce charging frequency.
- Rental-friendly: Adhesive mounts and removable channels preserve finishes.
For tight corners, use flexible strip connectors and test beam overlap to avoid dead zones.
Power Budget Examples
- Rechargeable bars: 3–5W each; a pair provides sufficient navigation lighting for small kitchens.
- Plug-in strips: 5–10W per meter; dim to 30–50% for evening ambience.
- RV setups: Motion activation extends runtime; charge weekly depending on usage.
Choosing the Right Lighting Layout: Strip, Bar, or Point-Based Placement
Form factor selection should reflect coverage needs and usage goals. Strips create continuous lines; bars deliver uniform task light; point-based pucks emphasize small areas. Choose by layout logic rather than product hype.
Form Factor Comparison
| Form Factor | Coverage | Install Ease | Best Use | Notes |
|---|---|---|---|---|
| LED Strips | Seamless, continuous lines | High (adhesive/channels) | Long runs; low-profile modern installs | Use diffusers to hide diodes; match CCT/CRI |
| LED Bars | Uniform task illumination | Medium (clips/screws) | Deep counters; primary prep zones; desks | Often dimmable; slight overlap between segments |
| Puck Lights | Localized accent spots | High (adhesive/screws) | Display niches; small areas | Space 8–12 in; use diffusion to reduce hotspots |
Layout Mapping by Space
- Kitchens: Bars or dual-row strips for deep counters; continuous strips for long runs.
- Shelves: Strips in frosted channels; lower output to avoid glare.
- Desks: Bars with optics near the front lip; neutral CCT and high CRI.
- Closets: Motion-activated bars; vertical mounting for shelf reach.
Color Temperature and Brightness Choices by Room Function
Color and brightness determine comfort and accuracy. Warmer tones flatter materials; neutral tones suit tasks. Set output by surface reflectance, overhang depth, and distance to target plane.
Rules of Thumb
- Kitchen tasks: ~200–500 lumens/ft; target ~30–50 foot-candles on counters.
- Desks: 3000–3500K, CRI ≥90 for accurate paper and screen work; add dimming.
- Shelves: 2700–3000K warm; low output with diffusion for display comfort.
LEDs provide directional light suitable for task areas and can include dimming and occupancy controls for further savings.
Room-Specific Quick Specs
| Space | Goal | CCT | CRI | Target fc | Suggested Layout |
|---|---|---|---|---|---|
| Kitchen counters | Task | 3000–3500K | ≥90 | 30–50 | Front-edge bars or strips with diffusion |
| Shelves/display | Accent | 2700–3000K | ≥90 | 5–15 | Strips in frosted channels; low output |
| Desks/workstations | Task | 3000–3500K | ≥90 | 30–50 | Front-edge bars angled down; dimming |
| Closets/pantries | Navigation | 3000–3500K | ≥80 | 5–15 | Motion bars; vertical mounting near hinges |
Power and Control Considerations by Scenario (Hardwired, Plug-In, Motion, Smart)
Choose power and controls by permanence, aesthetics, and convenience. Hardwired installs integrate with wall switches; plug-in solutions are fast; motion and smart features automate usage and reduce waste.
Scenario Guidance
- Renovations: Hardwire bars; ensure code compliance and use wall dimmers or smart switches.
- Existing kitchens: Plug-in strips/bars; inside-cabinet outlets hide adapters and cords.
- Closets/pantries: Motion-activated bars with timeouts; low brightness to avoid glare.
- Smart homes: Voice control, schedules, and adaptive scenes across rooms.
Efficient luminaires and controls are recommended for cost-effective performance in guidance from federal programs U.S. DOE FEMP.
Decision Table
| Scenario | Power | Control | Pros | Cons |
|---|---|---|---|---|
| Renovation | Hardwired | Wall dimmer/smart | Clean look; integrated control | Requires electrician; higher upfront |
| Existing kitchen | Plug-in | Inline dimmer | Fast DIY; no wall cutting | Manage cords; outlet dependence |
| Closet/pantry | Rechargeable/plug-in | Motion/door switch | Hands-free; energy-saving | Charging cycles; sensor tuning |
| Smart home | Hardwired/plug-in | Smart schedules/voice | Automation; scenes | Setup complexity; compatibility |
Common Under Cabinet Lighting Layout Mistakes and How to Avoid Them
Common errors include back-set mounting, mismatched color temperatures, and uneven spacing. Use front-edge placement, consistent CCT/CRI, end-to-end runs, and diffusion to prevent gaps and hotspots.
Checklist
- Front-edge placement within ~1–2 inches; avoid mounting too far back.
- Match CCT (e.g., 3000–3500K) and CRI across all fixtures for consistency.
- Overlap bar beams slightly; mount strips end-to-end to eliminate seams.
- Add dimming for comfort and energy savings; consider motion for pantries.
🗣️ “We aligned color to 3000K, moved bars to the front edge, and the counter went from patchy glare to smooth, comfortable light.”
💡 Smart lighting means smart savings. With Lumaz LEDs, you get superior energy efficiency, lower bills, and a lifespan that makes the math work brilliantly for you.
Expanded Mistakes and Fixes
- Mixed CCT across layers: Standardize to one CCT per room to avoid visual patchwork.
- Over-bright accent lighting: Reduce output and add diffusion for comfortable ambience.
- Ignoring cable routing: Use channels and strain relief; hide adapters inside cabinets.
- Skipping dimming: Add dimmers to tune scenes and reduce energy use.
Planning an Under Cabinet Lighting Setup for Your Home
Plan by space type, usage goal, layout constraints, and control preferences. Create a quick sketch, test placements with painter’s tape, and standardize color settings to unify rooms.
Step-by-Step
- Define the goal: task, accent, or navigation.
- Select form factor: strip, bar, or puck based on coverage needs.
- Choose color/CRI: match adjacent fixtures for visual consistency.
- Decide power/control: hardwired, plug-in, motion, smart based on permanence and convenience.
- Mock-up placement; measure foot-candles; finalize mounts and cable routing.
FAQs
What brightness is best for kitchen counters?
Target ~200–500 lumens/ft and ~30–50 foot-candles on counters, adjusting upward for dark surfaces or deep overhangs.
Can strips and bars be mixed in one installation?
Yes, if CCT/CRI match and diffusion is consistent. Test beam overlap to avoid seams and hotspots.
Do motion sensors work for night navigation?
They do. Use very low output and sensor placement that avoids false triggers in high-traffic zones.
Which color temperature suits desks?
3000–3500K neutral with CRI ≥90 keeps text and graphics clear while minimizing screen glare.
Are plug-in lights durable for daily use?
Quality plug-in bars/strips are reliable. Use cord channels, listed adapters, and proper strain relief for safety and neatness.
Conclusion
Under cabinet lighting can transform both the functionality and ambiance of your home, whether in kitchens, shelves, desks, or enclosed storage. By considering your space, lighting goals, fixture types, and control options, you can create a setup that is both practical and visually appealing. Thoughtful planning helps avoid common mistakes and ensures long-term satisfaction with your lighting choices.
After considering all the factors mentioned, you can explore more product options and detailed buying guides on our Under Cabinet Lighting Hub Page to find the best solution for your needs.
Additional Guides in This Topic
-
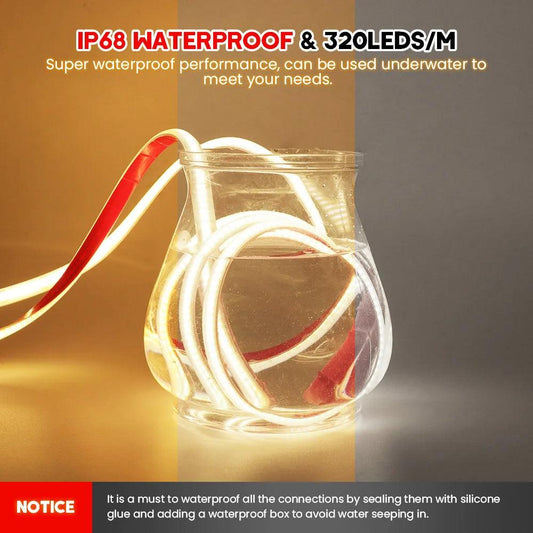
Moisture-Resistant Under Cabinet Lighting for Sinks & Wet Areas
- Under Cabinet Task Lighting vs Ambient Lighting: What’s the Difference?
- Under Cabinet Lighting for Safe Navigation at Night
Related Lighting Guides
- How to Choose Under Cabinet Lighting: A Complete Decision Guide
- Under Cabinet Lighting Installation: What’s Possible in Your Home
- Light Quality for Under Cabinet Lighting: Color, Brightness & Comfort
- Complete Guide to Smart Under Cabinet Lighting: Controls, Sensors & Automation
- Living with Under Cabinet Lighting: Longevity, Safety & Maintenance


 />
/>
 />
/>
 />
/>
 />
/>
 />
/>