
Light Quality for Under Cabinet Lighting: Color, Brightness & Comfort
Table of Contents
- Introduction to Light Quality for Under Cabinet Lighting
- Understanding Key Elements of Light Quality
- Color Temperature: Warm White, White, and Cool White Lighting
- Brightness: How Much Light Do You Need?
- Comfort and Visual Comfort in Lighting
- The Role of Diffusion in Light Quality
- Balancing Light Quality with Practical Considerations
- How to Test and Adjust Light Quality in Your Space
- Choosing the Right Under Cabinet Lighting for Your Needs
- FAQs
- Conclusion: Achieving Optimal Light Quality for Comfort and Functionality
Introduction to Light Quality for Under Cabinet Lighting
Light quality under cabinets determines both task clarity and evening comfort. When chosen well, it removes shadows, reduces glare, and makes counters feel calm and usable all day.
Under cabinet lighting affects food prep safety, finish appearance, and how the kitchen feels at night. Proper color temperature, brightness, and diffusion make a small footprint perform like a major upgrade.
Understanding Key Elements of Light Quality
Light quality rests on three linked elements: color temperature, brightness, and visual comfort. These define how natural the space looks, how clearly you can work, and how soothing it feels after dark.
Core components
- Color temperature: the “warmth” or “coolness” of white light (measured in Kelvin).
- Brightness: total output and on-counter illuminance (lumens and lux/footcandles).
- Comfort: glare control, uniformity, flicker stability, and color rendering quality.
Decision rules
- Match color temperature to mood and task: warm for calm, neutral for clarity.
- Size brightness to the run length and task demand; add dimming for evenings.
- Use diffusion and front placement to prevent hotspots on glossy stone.
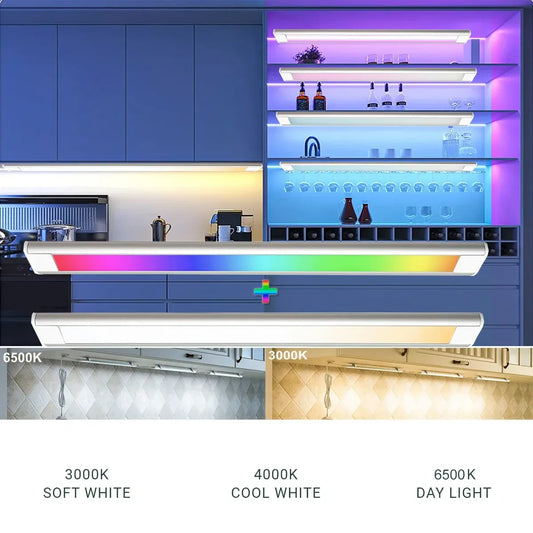
Color Temperature: Warm White, White, and Cool White Lighting
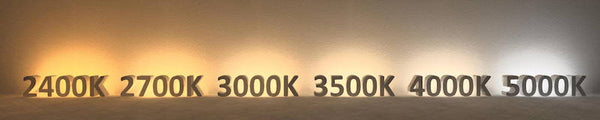
Choose color temperature by the atmosphere and task type. Warm white relaxes, neutral white balances clarity and comfort, and cool white maximizes contrast in utility areas.
Warm White (≈ 2700–3000K)
Creates a cozy, inviting feel ideal for kitchens and dining zones where you unwind. It softens finishes and pairs well with evening dimming.
- Best for: residential kitchens, dining nooks, living-adjacent counters.
- Visual effect: gentle contrast, warmer wood and brass tones, relaxed mood.
- Pairing: dimming and good diffusion to avoid sparkle on polished surfaces.
White / Neutral White (≈ 3500–4000K)
Delivers natural whites with minimal tint, making it the most versatile choice for clear task visibility without a cold appearance.
- Best for: worktops, home offices, or any zone needing crisp, even illumination.
- Visual effect: balanced color, clean finishes, steady clarity across tasks.
- Pairing: high CRI (≥ 90) to improve reading small labels and fine textures.
Cool White (≈ 5000–6500K)
Emphasizes contrast and edge detection for utility spaces. It can feel clinical in living areas, so use sparingly in kitchens unless the aesthetic requires it.
- Best for: garages, workshops, and bright task zones where precision matters.
- Visual effect: high contrast, stark whites, functional and energetic mood.
- Pairing: strong diffusion and careful placement to prevent backsplash glare.
Comparison table (color temperature)
| Color Temp | Mood | Task Clarity | Finish Appearance | Best Use |
|---|---|---|---|---|
| 2700–3000K | Cozy, calm | Moderate | Warm glow, flattering wood/metal | Kitchens, dining, living-adjacent counters |
| 3500–4000K | Balanced | High | Neutral, natural whites | Worktops, home offices, general task |
| 5000–6500K | Energetic | Very high | Stark whites, clinical feel | Utility, garages, precision tasks |
For program context and definitions, review ENERGY STAR — Lighting.
Detailed Insight:
- The Best Color Temperature for Under Cabinet Lighting: Warm vs. Cool
- Difference Between Soft White vs. Daylight Bulbs?
Brightness: How Much Light Do You Need?
Size output to task and run length, then add dimming for comfort. Most kitchen counters feel clear at 300–500 lumens per foot with on-counter targets near 30–50 footcandles.
Numeric targets
- Lumen density: 300–500 lm/ft for task; 150–250 lm/ft for evening ambient.
- Footcandles on counter: ~30–50 fc (≈ 325–540 lux) for chopping and reading.
- Uniformity: aim for ≤ 3:1 bright-to-dark ratio across the run.
Sizing method
- Measure each cabinet run length and multiply by target lumen density.
- Choose drivers/bars with 10–20% headroom for dimming and uniformity.
- Use front setback (1–2 inches) to project light forward onto the work zone.
Community perspective
🙂 “We set our kitchen to neutral white at a medium brightness for prep, then dim to warm in the evening. The counters feel calm, and the light never overwhelms the room.”
Detailed Insight:
Comfort and Visual Comfort in Lighting
Comfort depends on glare control, diffusion, and stable dimming. When optics are diffused and placement is correct, counters look bright without sparkle or hard shadows.
Glare control rules
- Set fixtures 1–2 inches behind the front lip to avoid backsplash streaks.
- Prefer frosted lenses or micro‑prismatic optics to hide LED points.
- Use wider beams (≥ 90°) on glossy stone to reduce specular highlights.
Color rendering and flicker
- CRI: choose ≥ 90 for food prep clarity and natural whites.
- Flicker: test dimming at low levels; prefer drivers with smooth PWM or dim‑to‑warm curves.
- Consistency: keep one color temperature per zone to avoid “two‑tone” whites.
💡 With Lumaz, light quality means comfort first and clarity always. Warm, diffused, and smartly dimmed—your counters look better and your evenings feel calmer.
For workplace electrical safety references that also apply to residential best practices, see OSHA — Electrical Safety.
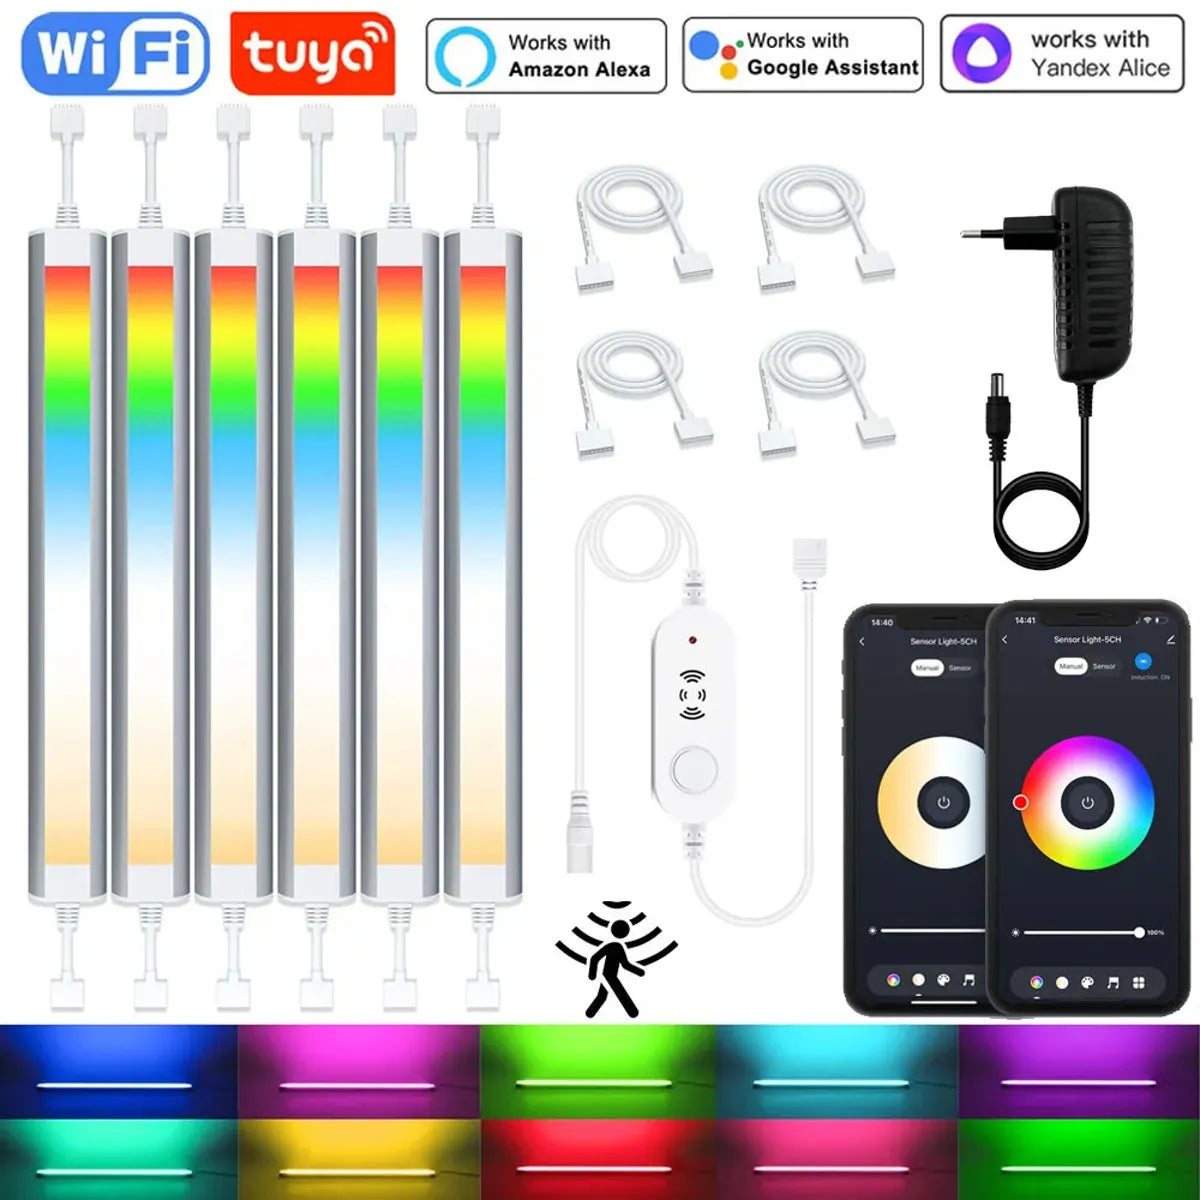
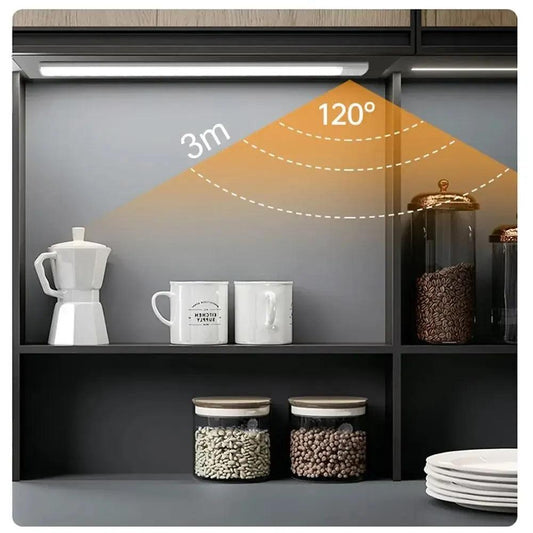
To achieve optimal visual comfort, it’s essential to select lighting that minimizes glare and ensures even illumination. The 12V Tuya WiFi Under Cabinet LED Light Bar with its RGBCCT dimming and motion sensor, adapts to your needs, providing soft, balanced light that’s perfect for kitchen countertops or workspaces, while adjusting automatically to enhance comfort.
The Role of Diffusion in Light Quality
Diffusion spreads light evenly and hides harsh points. The right lens or channel turns bright LEDs into smooth layers that feel soft yet clear.
Diffusion types
- Frosted lens: softens points, excellent for polished stone and glossy backsplashes.
- Opal channel: deeper cavities dispersing light for high uniformity.
- Micro‑prismatic: balances forward throw with glare reduction.
Placement and lens pairing
- Front setback: 1–2 inches behind the lip for forward projection.
- Continuous coverage: avoid gaps over 1 inch to maintain visual uniformity.
- Corner handling: bridge short segments to remove hard shadow pockets.
Balancing Light Quality with Practical Considerations
Balance optics with wiring and layout constraints. The best quality often comes from simple choices executed cleanly: front placement, diffusion, and matched controls.
Power and wiring
- Hardwired: cleanest look; use listed connectors and plan drivers with headroom.
- Plug‑in: fastest; manage cables with clips and raceways for tidy runs.
- Battery: flexible; ideal for rentals and utility areas with limited outlets.
Trade‑offs
- Hardwired: highest visual cleanliness, requires electrician for new circuits.
- Plug‑in: moderate cleanliness, excellent speed and cost control.
- Battery: lowest effort, limited output and periodic charging.
How to Test and Adjust Light Quality in Your Space
Validate your choices before committing. Quick tests with temporary lights and a phone lux app reveal hotspots and dimming behavior in your exact kitchen.
Pre‑install tests
- Set a temporary bar under the front lip and photograph the counter at night.
- Use a lux app; target ~325–540 lux on key prep spots.
- Scan for glare streaks on the backsplash; add diffusion or adjust setback.
Post‑install adjustments
- Tune dimmer minimums to avoid flicker; match driver/dimmer types.
- Set evening scenes to warm (3000–3500K) and lower output for comfort.
- Unify color temperature across under‑cabinet and ambient layers.
Choosing the Right Under Cabinet Lighting for Your Needs
Pick fixture type based on spread, glare control, and install method. Linear bars and strips deliver uniformity; puck lights create accents; integrated channels hide optics elegantly.
Fixture comparison
| Fixture Type | Spread | Glare Control | Typical Output | Install Complexity | Best For |
|---|---|---|---|---|---|
| Linear bars | Wide, uniform | High (frosted lens) | 300–500 lm/ft | Low–Medium | Main task runs |
| LED strips + channel | Wide, configurable | High (opal/matte) | 300–600 lm/ft | Medium | Custom lengths, hidden optics |
| Puck lights | Narrow spots | Moderate | Individual pucks (150–300 lm) | Low–Medium | Accent zones, niches |
| Integrated channels | Wide, elegant | Very high | Varies by build | Medium–High | Premium installs |
Selection checklist
- Match spread to counter depth; prefer front placement for task reach.
- Choose high CRI (≥ 90) and consistent color temperature across layers.
- Ensure dimmer/driver compatibility; test low‑end control for flicker.
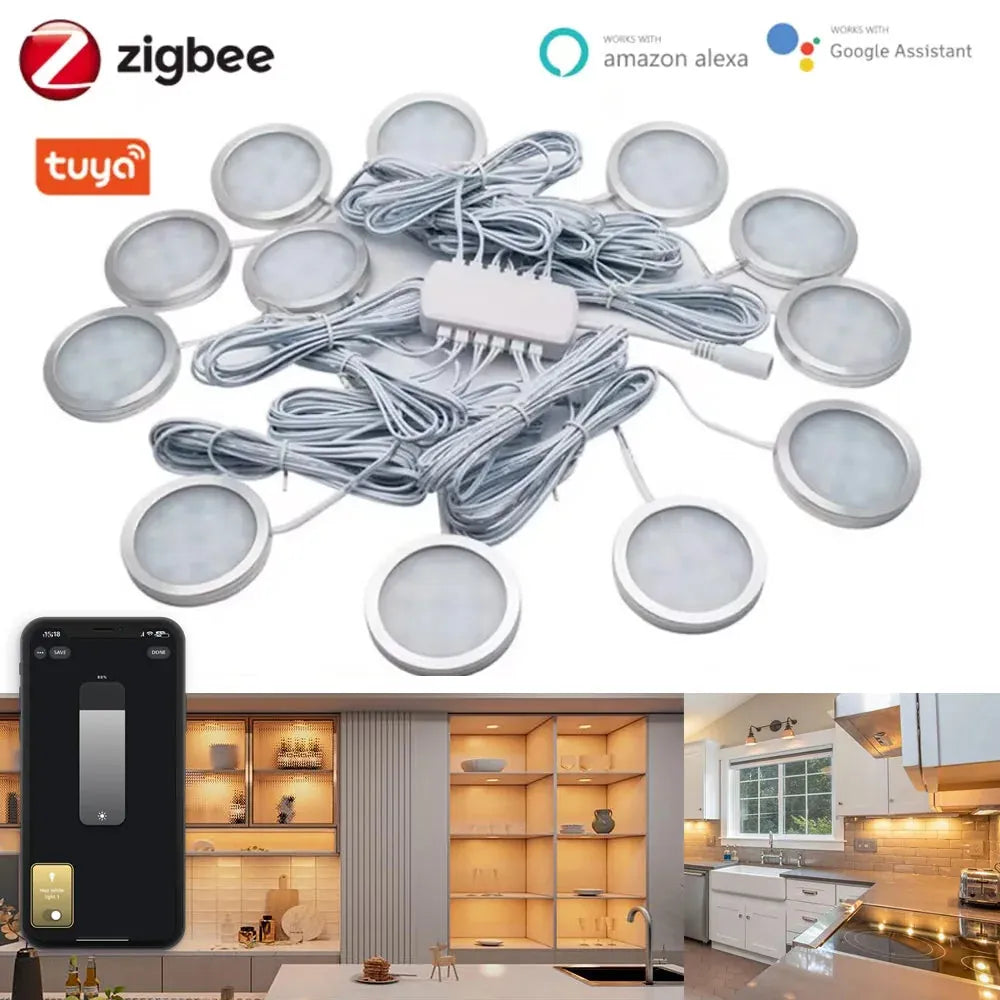
For those seeking precise, customizable lighting, the Tuya Zigbee Smart Under Cabinet LED Puck Lights offer both app and voice control, allowing you to adjust lighting levels and create the perfect atmosphere. With their compact design and 12V setup, these puck lights provide targeted illumination, making them an ideal choice for accent lighting in kitchens, living areas, or offices.
FAQs
What color temperature is best if my kitchen has glossy stone?
Neutral white (3500–4000K) with frosted or opal diffusion controls sparkle while keeping text and edges sharp. Use wider beams (≥ 90°) and front setback.
How bright should under cabinet lights be for reading recipes?
Target ~30–50 footcandles on the counter. Size lumen density at 300–500 lm/ft and add dimming to reduce output at night.
How do I reduce backsplash glare without moving fixtures?
Add a matte lens or channel, lower the output slightly, and angle beams forward if possible. Check uniformity; bridge gaps over sinks and corners.
Can I mix warm and neutral lights in the same kitchen?
Keep one temperature per layer. Use warm for evening ambient and neutral for task, but avoid mixing temperatures within the same under‑cabinet run.
Do I need a special dimmer for LED bars?
Yes. Match dimmer type to the driver (TRIAC, ELV, 0–10V). Test low‑end control to avoid flicker and color shift.
Conclusion: Achieving Optimal Light Quality for Comfort and Functionality
Optimal light quality blends neutral color, right‑sized brightness, and soft diffusion. Test quickly, tune dimming, and keep placement consistent to make counters look calm and clear.
Adjust color temperature by time of day, maintain uniform coverage, and verify lux targets where you actually work. With small changes, your kitchen can feel brighter, safer, and more welcoming.
After considering all the factors mentioned, you can explore more product options and detailed buying guides on our Under Cabinet Lighting Hub Page to find the best solution for your needs.
Additional Guides in This Topic
- What is the Best Lumens for Under Cabinet Lighting?
-
How Many Under Cabinet Lights Do I Need?
- Choosing the Right Materials for Under Cabinet Lighting
Related Lighting Guides
- Under Cabinet Lighting for Any Home Space: Kitchens, Shelves, Desks, and Cabinets
- Under Cabinet Lighting Installation: What’s Possible in Your Home
- How to Choose Under Cabinet Lighting: A Complete Decision Guide
- Complete Guide to Smart Under Cabinet Lighting: Controls, Sensors & Automation
- Living with Under Cabinet Lighting: Longevity, Safety & Maintenance


 />
/>
 />
/>
 />
/>
 />
/>
 />
/>